1 Introduction
ezDV is a handheld hardware device that allows easy use of FreeDV, whether on the go or at home. Powered by an ESP32-S3 microcontroller, its built-in Wi-Fi support allows completely wireless setup (with supported radios) along with enabling more modern functionality such as FreeDV Reporter reporting and wireless firmware updates.
For those radios without network capability, interfacing them with ezDV is straightforward through the use of the industry standard 3.5mm TRRS audio jack. This jack is configured similarly to what is used with wired headsets for mobile phones. Analog audio is also passed in and out from/to your wired headset using a second 3.5mm audio jack.
This document describes the configuration and recommended usage of the ezDV device for maximum enjoyment and minimal frustration. Hope to hear you on the air!
2 Setting up ezDV
There are several steps required to get ezDV up and running with your radio.
2.1 Initial assembly
If ezDV did not already come with a battery, you will need to obtain a 3.7V lithium polymer (LiPo) battery. One recommended battery can be purchased from Amazon.
WARNING: Do not puncture or otherwise damage lithium batteries as injury and/or property damage could result! Neither the project nor its creator take responsibility for any damage or injury due to misuse of batteries. A battery with a protection module (such as the one linked above) is highly recommended.
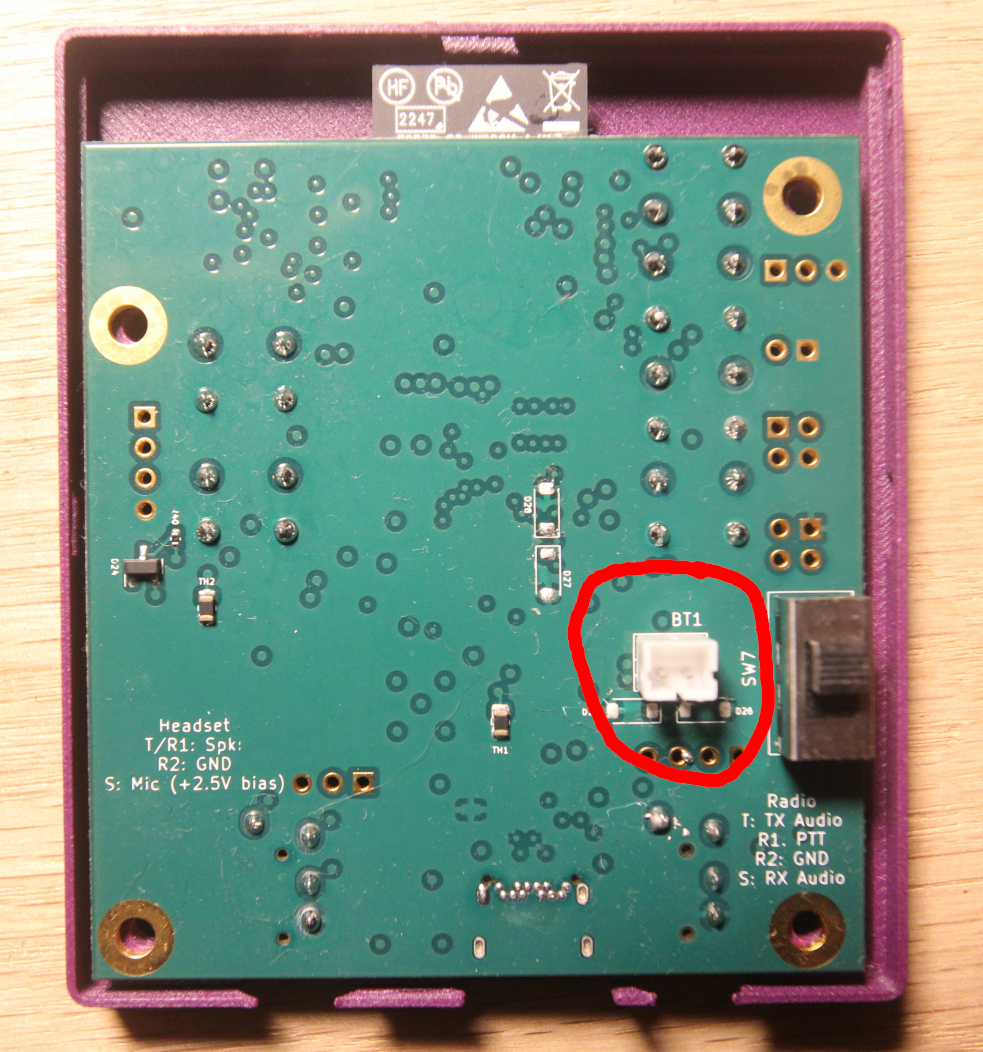
The battery should be plugged into the BT1 connector on the bottom of the ezDV circuit board, which is the circled connector below:
Once a battery is attached, you should flip the switch to the right of the BT1 connector upwards (towards the back of the ezDV board) to connect the battery to the rest of the board. This switch is designed to allow for long-term storage or shipping of ezDV without discharging the battery. Note that ezDV may power on immediately after flipping this switch; you can power it down by pushing and holding the Mode button (second button from the top when looking downward) until red lights turn on on the right-hand side.
Note: it is not recommended to use this switch for normal operation of ezDV. Some features require an orderly shutdown of ezDV (which is accomplished by using the Mode button) and may not function properly if power is suddenly lost.
Next, plug ezDV into a USB-C charger (similar to what would be done to charge a cell phone or portable power bank). A red LED may light on the bottom of ezDV indicating that the battery is charging as well as some or all of the LEDs on the right hand side (indicating its current state of charge in 25% increments). When ezDV is done charging, a green LED will turn on and the red LED will turn off. This may take several hours or more depending on the state of the battery.
Finally, plug in a wired headset on the TRRS jack located on the right side of the ezDV board (when looking from above). This headset should be wired for compatibility with Android phones, which is as follows:
- Tip: RX audio from ezDV
- Ring 1: RX audio from ezDV
- Ring 2: GND
- Shield: TX microphone audio to ezDV
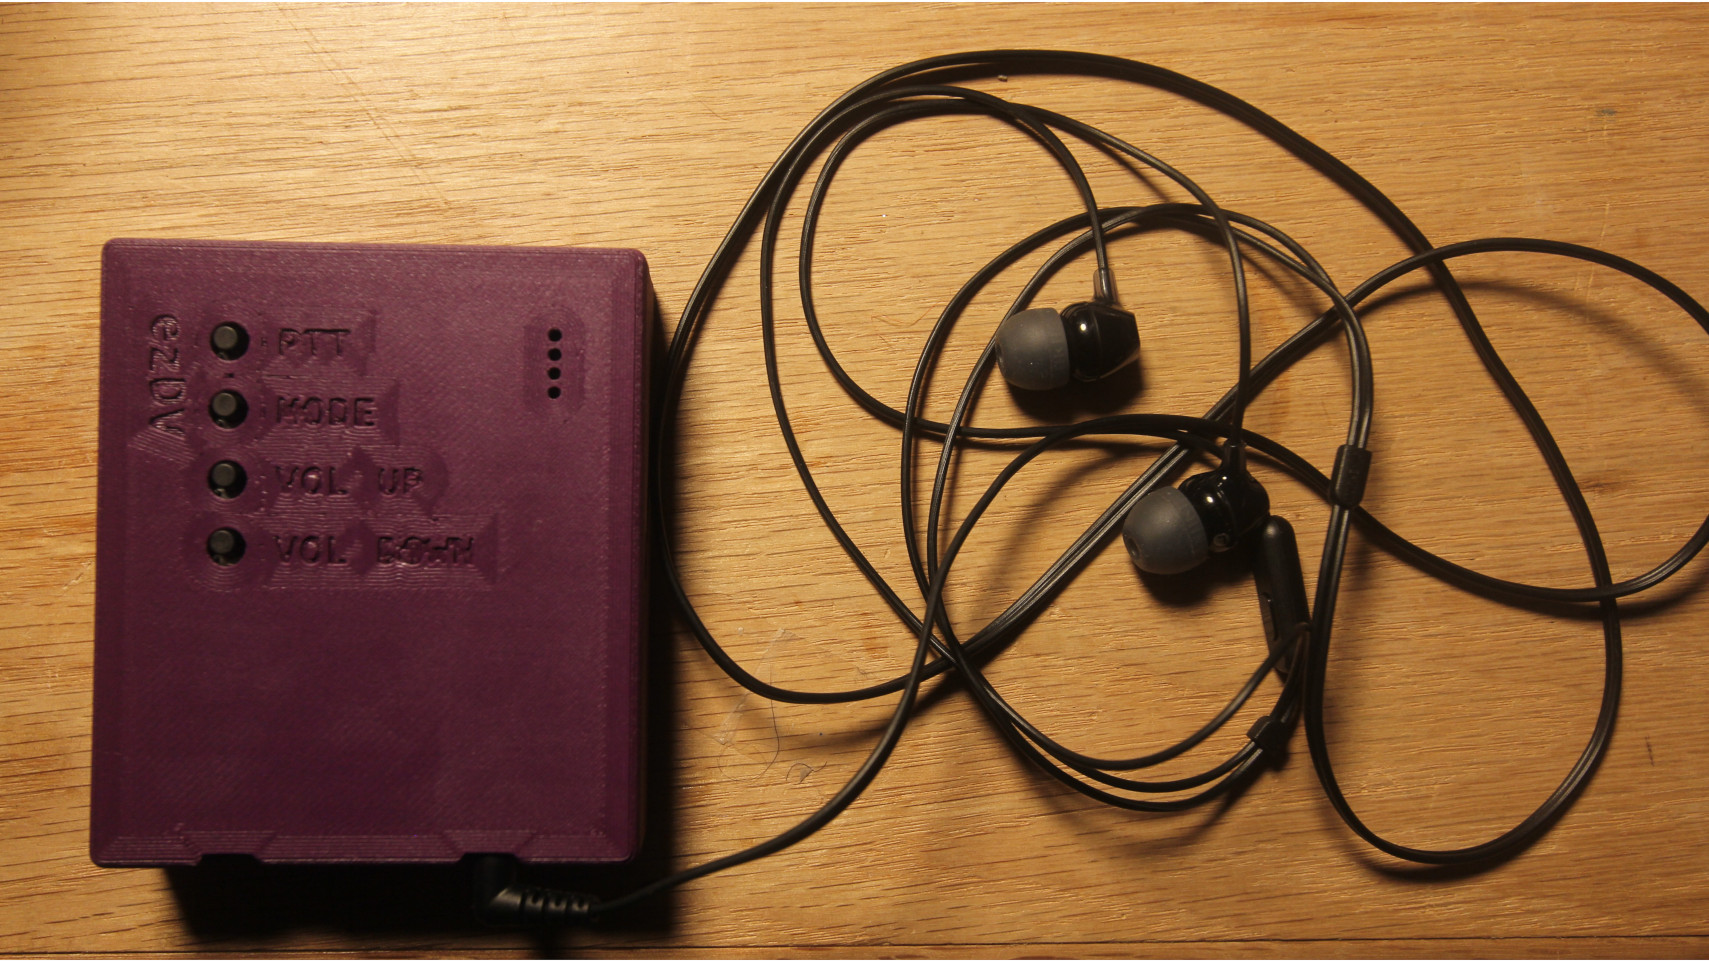
Once attached, ezDV will appear as follows:
2.2 Radio wiring
2.2.1 Radios without network support
Radios without network support will need an interface cable. One end of this cable should be a male 3.5mm four conductor (TRRS) with the following pinout:
- Tip: TX audio from ezDV to your radio
- Ring 1: PTT to radio (this is connected to GND when you push the PTT button)
- Ring 2: GND
- Shield: RX audio from your radio to ezDV
There is also silkscreen labeling on the back of the board corresponding to the location of the radio jack that indicates the pinout. This jack is on the left hand side of ezDV when looking downward at the front of the device.
More information on example wiring configurations for various radios can be found in the Example Wiring Configurations section.
2.2.2 Radios with network support
If you have a radio that is capable of remote network access, you can configure ezDV to connect to the radio over Wi-Fi or Ethernet. Currently this is supported only for the FlexRadio 000/8000 series radios and the Icom IC-705.
2.2.2.1 Flex 6000/8000 series radios
Ensure that you can access your radio using the SmartSDR software from a PC on the same network (i.e. not using SmartLink). Once this is confirmed, skip to Initial Configuration.
2.2.2.2 Icom IC-705
Several settings will need to be adjusted in the IC-705 before it can be used with ezDV. See “Configuring Wi-Fi on the Icom IC-705” or your radio’s user manual for more information on configuring Wi-Fi.
2.3 Initial configuration
To perform initial configuration of ezDV, push and hold both the Mode and Volume Down buttons at the same time until all four of the LEDs on the right hand side of ezDV turn on.
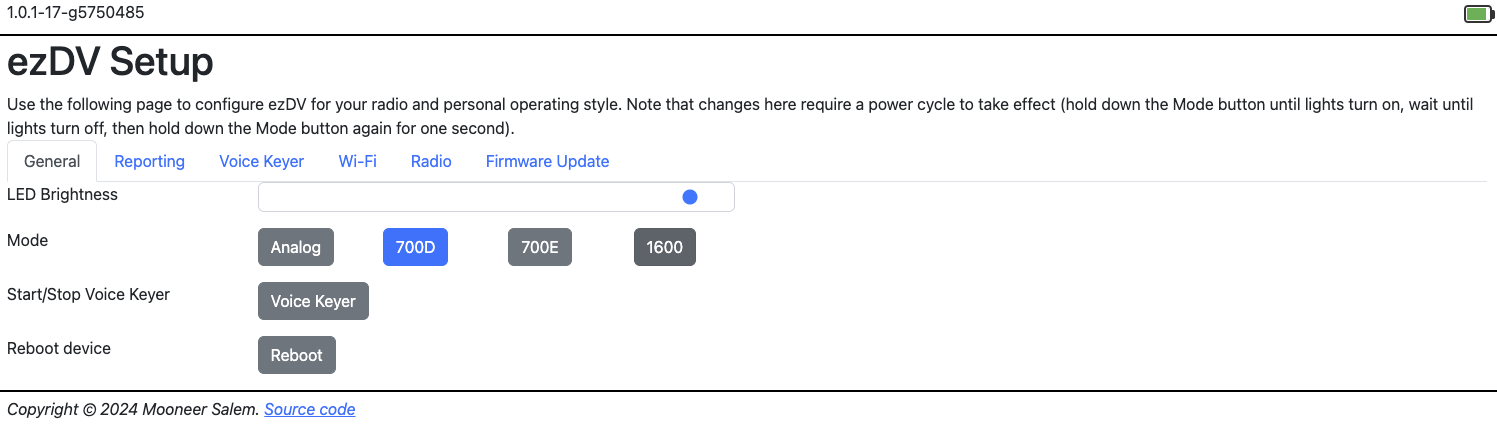
Once the LEDs turn off, go to your PC or cell phone’s Wi-Fi configuration and join a network named “ezDV xxxx”, where “xxxx” is the last few alphanumeric digits of its MAC address (a unique identifier for each network device). Once joined, open your Web browser and navigate to http://192.168.4.1/. You should see a page similar to the following:
2.3.1 Transmit audio levels
2.3.1.1 Flex 6000/8000 series
ezDV uses a hardcoded transmit level when connected to the Flex 6000/8000 series of radios, so adjusting the transmit level on ezDV has no effect.
2.3.1.2 Other radios
Note: for the Icom IC-705, this can only be done after configuring Wi-Fi and the radio connection.
ezDV’s transmit audio levels will need to be adjusted to ensure that your radio does not indicate too much ALC, similar to other HF digital modes. You can adjust the transmit audio by pushing the Volume Up or Volume Down buttons while holding the PTT button as indicated below:
For most radios, ezDV’s transmit level should be such that little to no ALC is indicated on the radio display. The specific ALC level required depends on the radio, so your radio’s user manual is the best source for determining this. Alternatively, you can increase the TX audio level until your power output stops increasing, then decrease it again until your power output begins to decrease.
Note: it’s recommended to have your radio attached to a dummy load while adjusting your transmit audio levels to prevent interference to other operators.
2.3.2 Network configuration
Note: this is optional unless you are using a radio with network support or wish to use other Internet connected features (such as reporting to FreeDV Reporter and PSK Reporter).
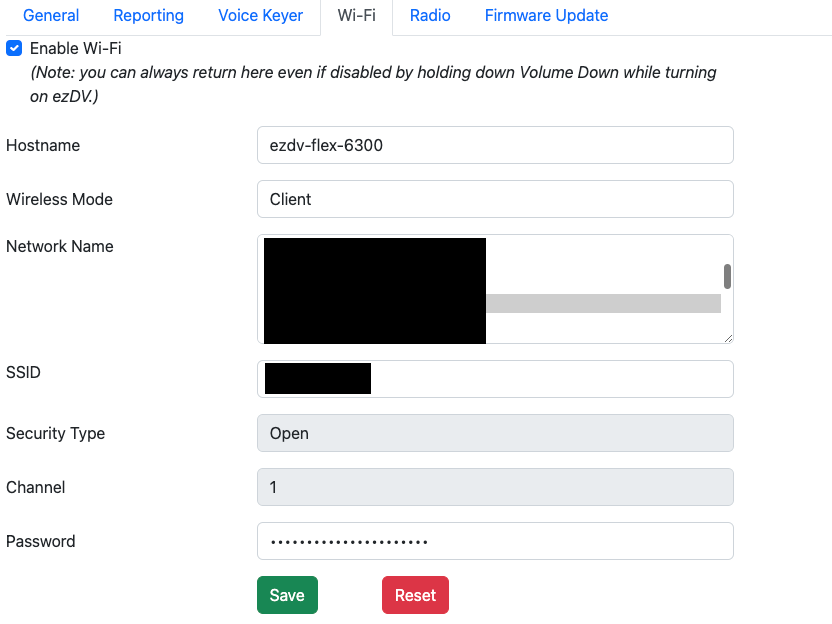
Click or tap on the “Network” tab and check the “Enable Wi-Fi” checkbox. You’ll see something similar to the following:
Note: experimental support exists for Ethernet on ezDV. See “Setting Up Ethernet Support” for more information.
To connect ezDV to the network that your radio is on, select “Client” for “Wireless Mode”. Select your Wi-Fi network from the list that appears (which may take a few seconds while ezDV scans for your network) and enter its password (if required). If desired, you can also change ezDV’s name by modifying the “Hostname” field; this may allow you to access ezDV later by entering this name instead of trying to find its IP address. Click or tap Save to save your Wi-Fi settings.
2.3.3 Radio connection
Note: this is optional unless you are using a radio with Wi-Fi support.
Click on the “Radio” tab and check the “Use Network for Radio RX/TX” checkbox. Select your radio model in the “Radio Type” drop-down list, which will bring up different fields depending on the radio being configured.
2.3.3.1 Flex 6000/8000 series
Select the name of your radio from the “Radio” drop-down list as shown below. Your radio’s IP address should automatically be filled in the “IP Address” field:
Click or tap Save to save the radio configuration.
2.3.3.2 Icom IC-705
Enter your radio’s IP address, username and password that you saved when you configured Wi-Fi on the IC-705:

Click or tap Save to save the radio configuration.
2.3.4 Reporting configuration
It is highly recommended to configure your callsign and grid square. This has several benefits:
- If ezDV is lost or stolen, someone can access its Web page and use callsign databases like QRZ to find a way to get it back to you.
- Other users will be able to decode your callsign and report spots on FreeDV Reporter and PSK Reporter.
- If ezDV has Internet access, it will also be able to decode callsigns from received signals and report them itself to FreeDV Reporter and PSK Reporter.
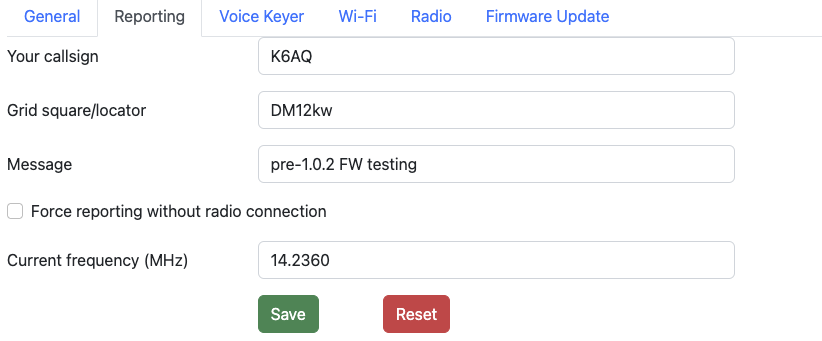
To do this, click or tap on the “Reporting” tab and enter your callsign and grid square where prompted:

If desired, you can also enter a short message that will appear on FreeDV Reporter. This message is transmitted solely over the Internet, not over RF.
Once done, click or tap Save to save the reporting configuration.
2.3.5 Final setup
After your radio, Wi-Fi and reporting configuration are complete, simply click or tap on the General tab and then click or tap on the Reboot button. ezDV will first show two red LEDs on the right hand side for a few seconds, then show all four LEDs for a few seconds, then turn them all off. If you’re using a wired connection to ezDV, it is now ready for use.
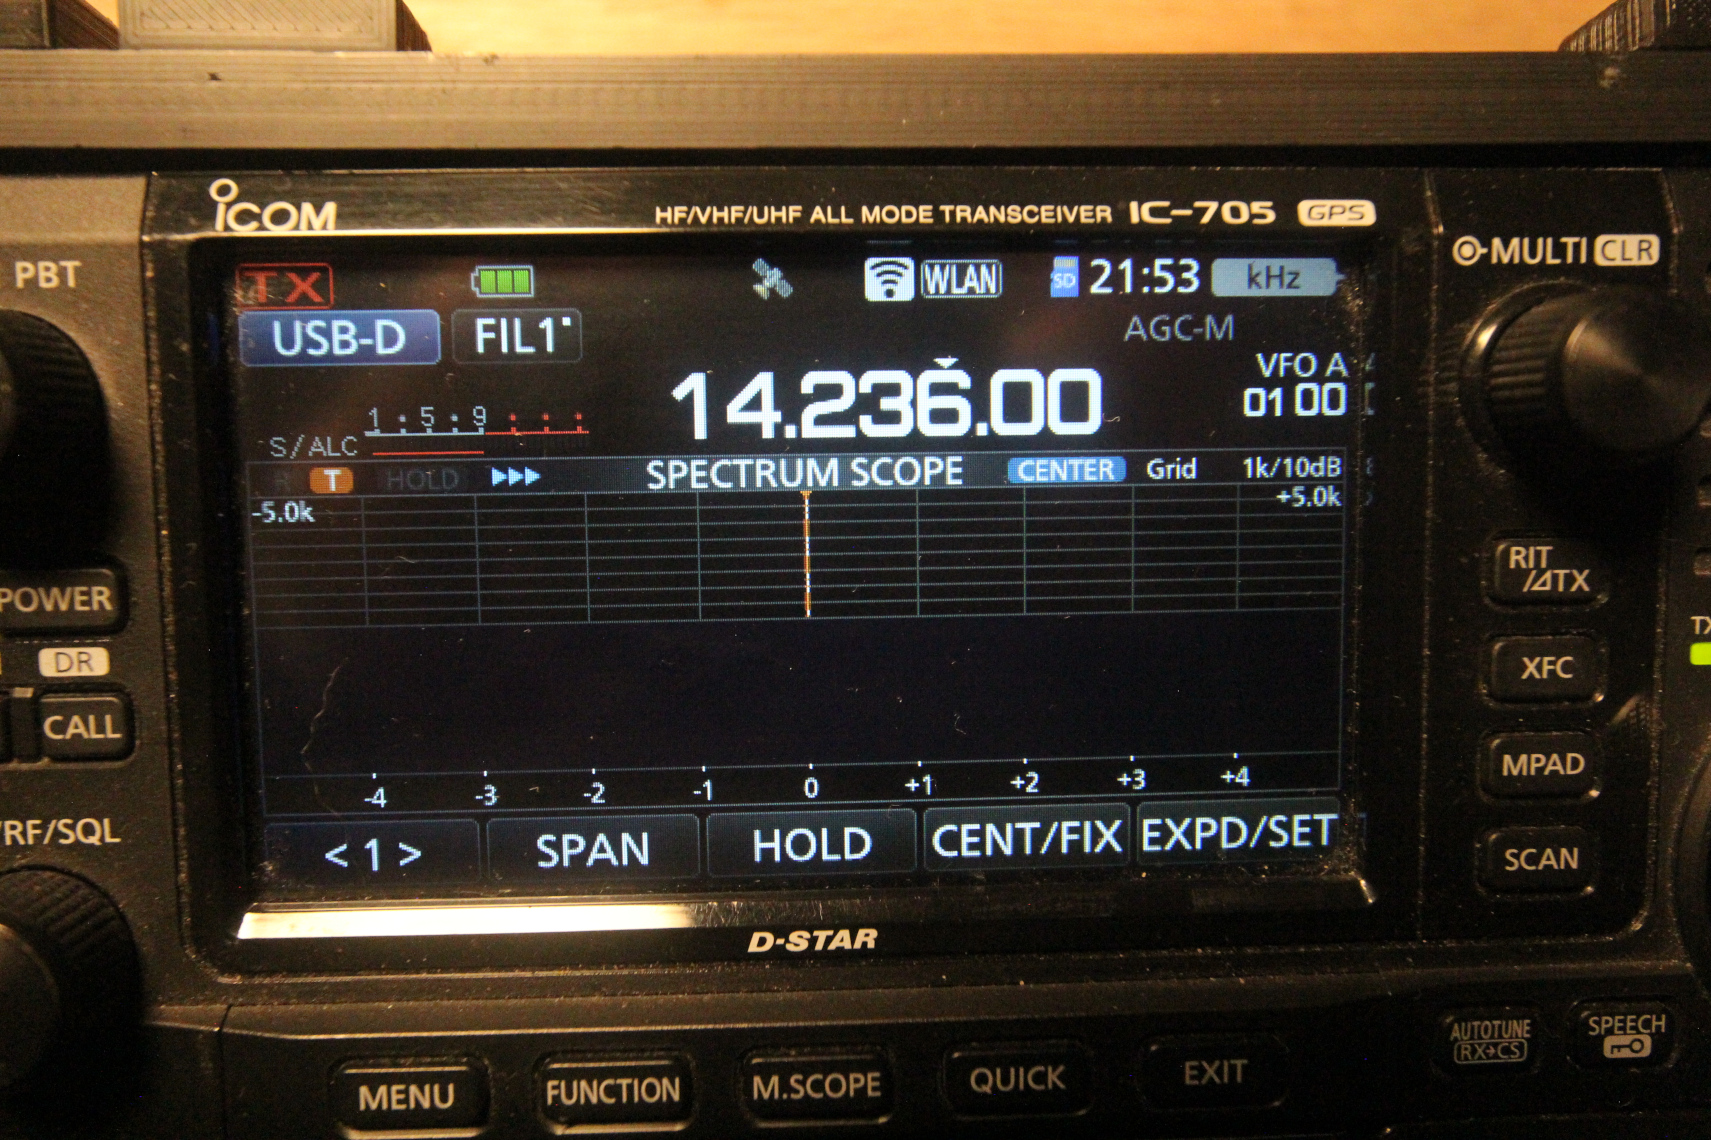
If you configured a Wi-Fi network and radio for ezDV to connect to, ezDV should then begin blinking a blue LED (indicating that it is connected to the Wi-Fi network) followed by showing a solid blue LED if it’s able to connect to the radio. On the IC-705, a WLAN indicator will appear if ezDV is connected to the radio as shown below:
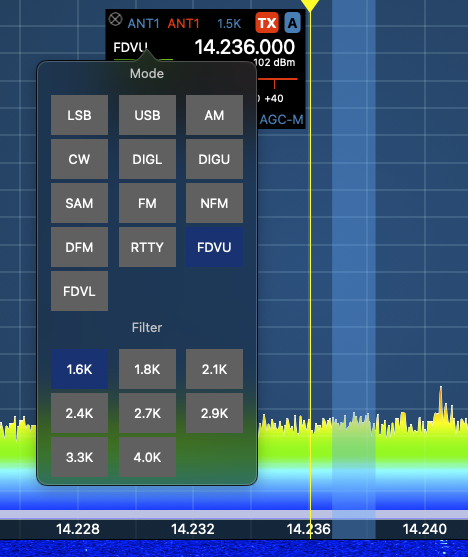
For Flex 6000/8000 series radios, opening the SmartSDR software will show a “FDVU” (for upper sideband) and “FDVL” (for lower sideband) mode if ezDV is properly connected to the radio:
3 Basic usage
3.1 External controls
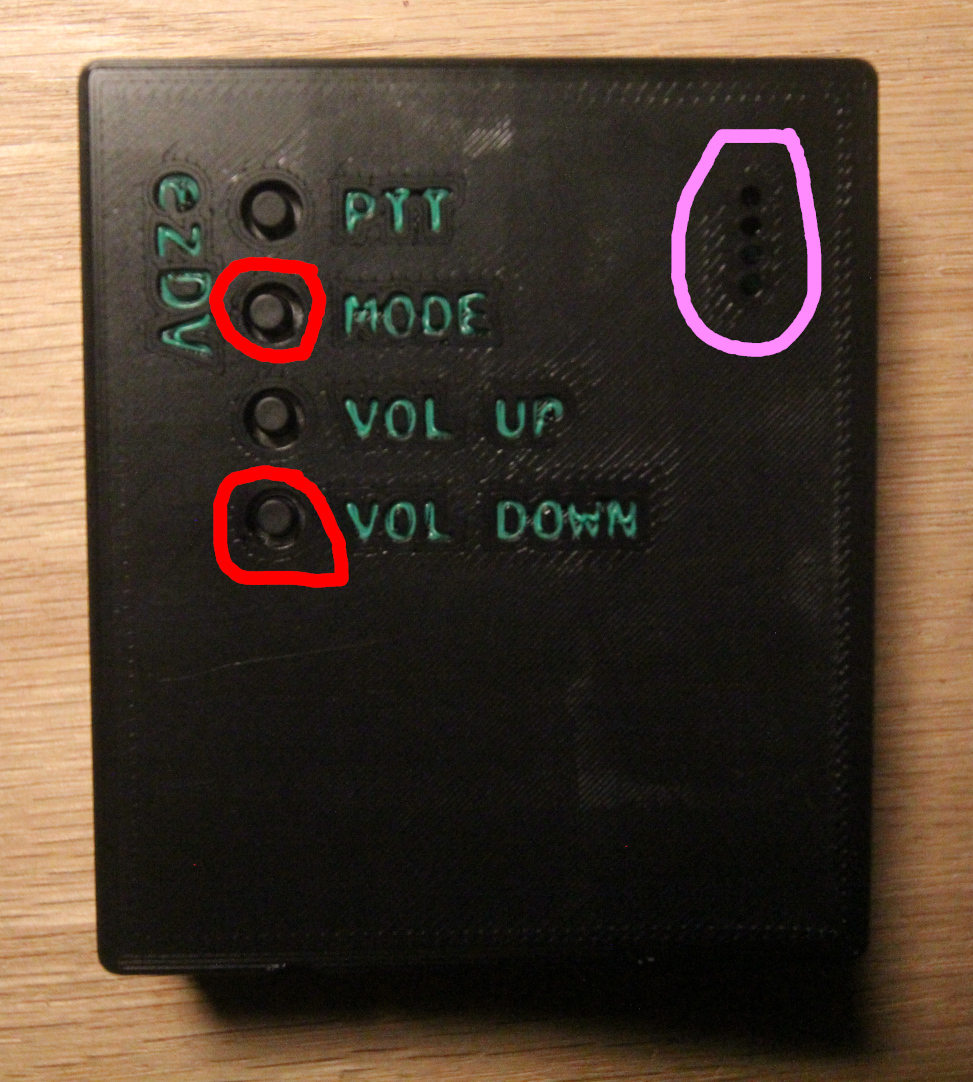
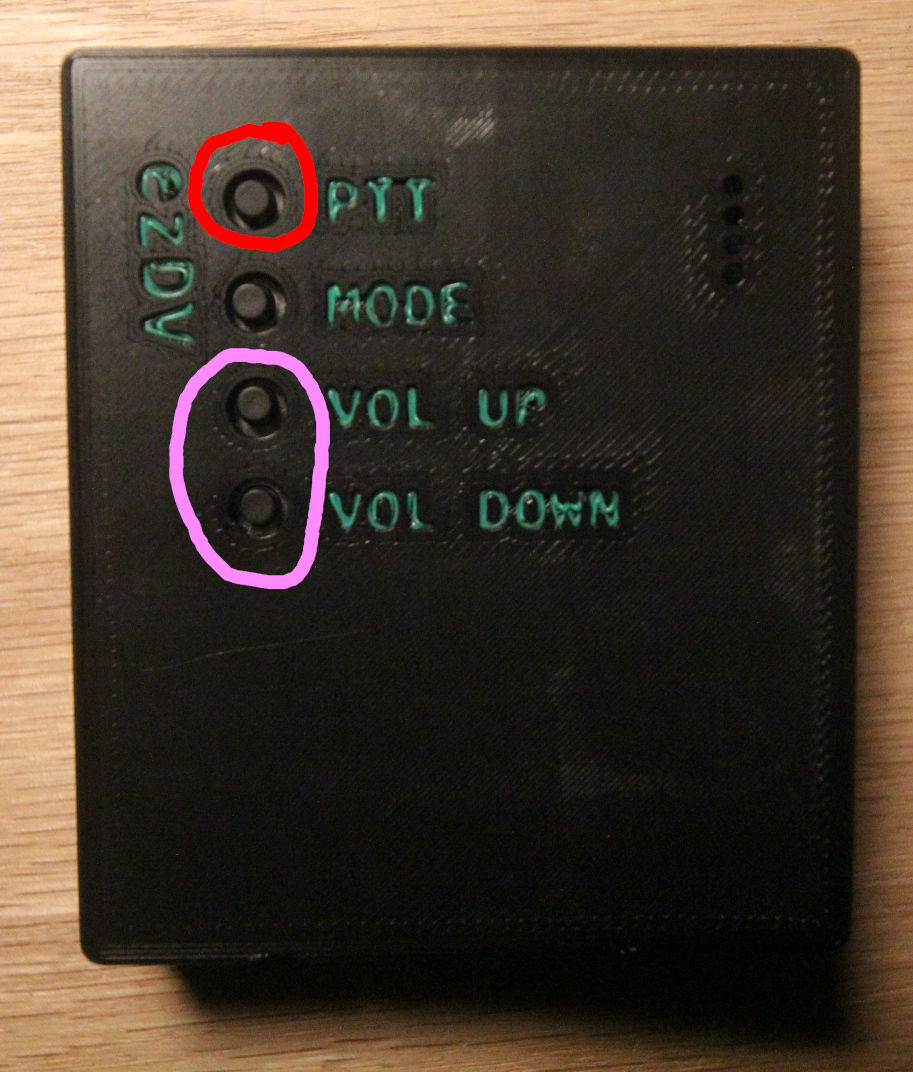
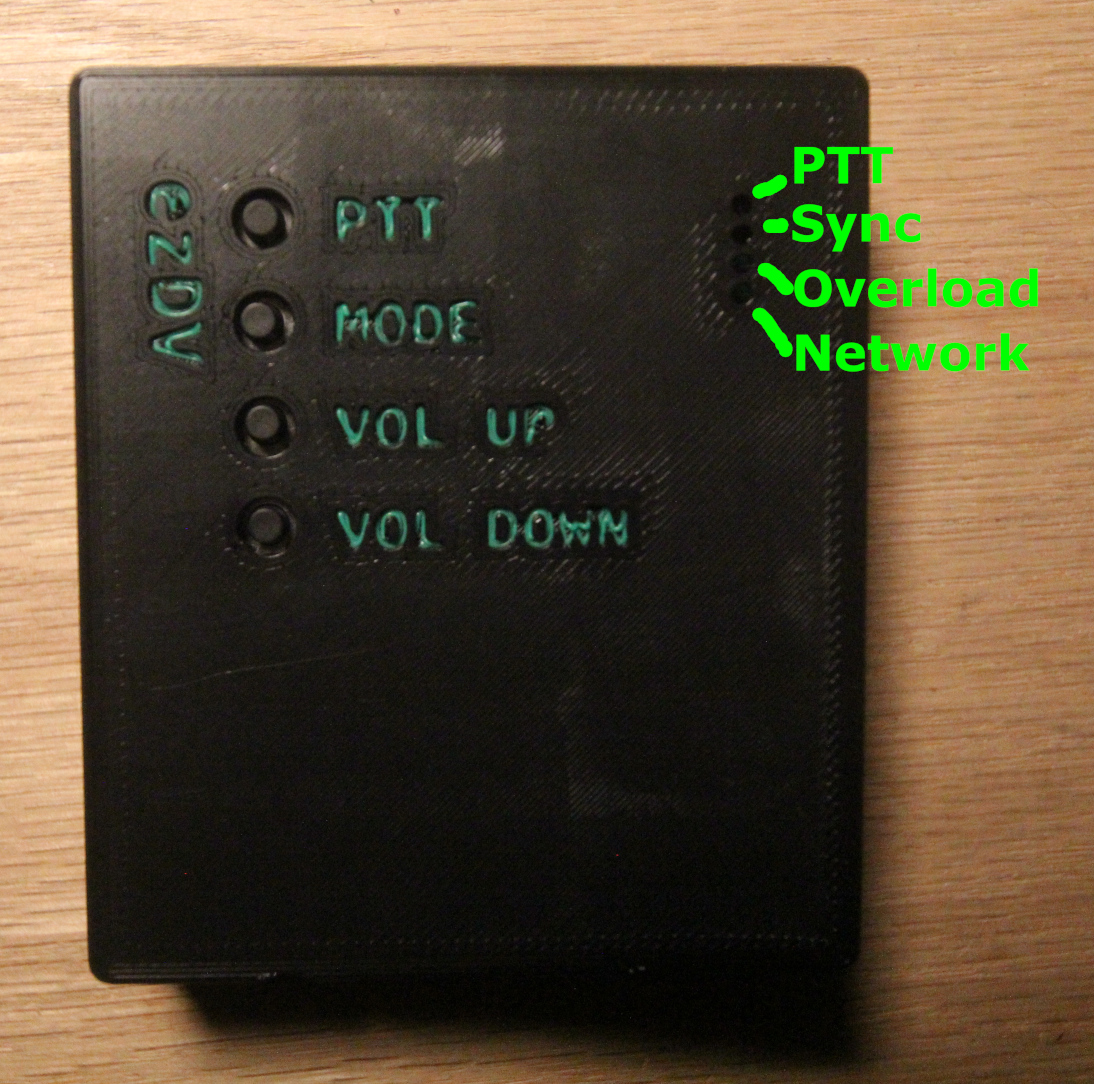
ezDV has four buttons on the left, in order from top to bottom:
- Push To Talk (PTT)
- Mode
- Volume Up
- Volume Down
as well as four status LEDs on the right hand side (again from top to bottom):
- PTT (red; on if transmitting)
- Sync (green; on if ezDV can decode an incoming FreeDV signal)
- Overload (red; on if the incoming RX/TX audio is clipping)
- Network (blue; will blink if it has a network connection and will be solid if connected to the radio)
These controls and LEDs are shown below:
3.2 Powering ezDV on and off
To turn on ezDV, press and hold the Mode button for more than 1 second. All four LEDs on the right hand side of the board should light briefly and then extinguish. You will also hear the last used mode in Morse Code on your wired headset or through SmartSDR if using a Flex radio. (On first start, this will be “700D”, which corresponds to FreeDV 700D mode.) Holding this button again for more than 1 second will result in ezDV turning off (with “73” also being piped through the headset in Morse Code, corresponding to the well-known ham radio term for “goodbye”).
If networking is enabled on ezDV, you will additionally hear the letter “N” emitted in Morse Code once the network interface comes up. If ezDV is configured to connect to an existing wireless network or via Ethernet, you will hear the last octet of the IP address immediately afterward. For example, if your router assigns the IP address “192.168.1.100” to ezDV, you will hear “N100” in the headset.
Note: if your network is configured with a “netmask” other than “255.255.255.0”, you may need to load your router’s configuration to obtain the rest of ezDV’s IP address. Otherwise, you can typically replace the last octet of your computer’s IP address with the number after the “N” when accessing ezDV with a web browser.
3.3 FreeDV operation
Pushing the Mode button briefly while in receive will cycle through the following modes:
- FreeDV 700D (“700D” will beep in Morse code)
- FreeDV 700E (“700E” will beep in Morse code)
- FreeDV 1600 (“1600” will beep in Morse code)
- Analog passthrough (“ANA” will beep in Morse code)
The current FreeDV mode can also be adjusted using ezDV’s web interface if preferred. See “Using the web interface” for more information.
Pressing and holding the PTT button will place the radio into transmit mode and transmit a FreeDV signal out over the air (or your voice verbatim if you are in analog passthrough mode). If configured, you can also use the call button on your wired headset to place the radio into transmit; pushing and releasing the call button will toggle between transmit and receive.
3.4 Radio setup and usage
3.4.1 Flex 6000/8000 series
To use ezDV, simply start the SmartSDR software on your PC or iPad and select either FDVU mode (for upper sideband) or FDVL (for lower sideband). Decoded audio as well as Morse code beeps will be output to your speaker. Use the MOX button in SmartSDR (or the PTT button on a microphone attached to the radio) to transmit, similar to when operarting the other voice modes.
3.4.2 Others
If your radio has a “data” mode, it’s recommended to enable this while using ezDV (or any FreeDV application or device). This typically disables any processing the radio would normally do for SSB voice, preventing the signal from being garbled. Please see your radio’s user manual for information about how to enable this mode.
3.5 Volume controls
The Volume Up and Down buttons adjust the receive audio by default. If the PTT button is also held while pushing Volume Up or Volume Down, the transmit audio level is adjusted instead. For best results, transmit audio should be adjusted while in 700D/700E/1600 mode such that the ALC indicator on your radio is just barely showing (similar to how to configure data modes).
3.6 Voice keyer
If configured, you can activate ezDV’s voice keyer functionality by holding down PTT and then pressing the Mode button. ezDV will then load the voice keyer file in its internal storage and play it back up to the number of times configured (with it pausing a configured number of seconds). By default, ezDV is configured to transmit the voice keyer file up to ten times, pausing for five seconds in between each transmission.
While the voice keyer is active, pressing any button on ezDV will stop the voice keyer and place it back into regular operation. If using a Flex 6000/8000 series radio, you can also stop the voice keyer by pushing the MOX button in SmartSDR
Configuration of the voice keyer functionality (as well as stopping and starting of the voice keyer) can also be done via ezDV’s web interface. See Using the web interface for more information.
3.7 Summary of controls
| Button | Action | Also pressed | ezDV behavior |
|---|---|---|---|
| PTT | Hold | (none) | Places radio into transmit and outputs FreeDV signal/analog audio. |
| Hold | Mode | If voice keyer is configured, activates voice keyer. Otherwise, cycles betweens FreeDV modes. | |
| Hold | Volume Up | Increases transmit audio level. | |
| Hold | Volume Down | Decreases transmit audio level. | |
| Mode | Press | (none) | Cycles between available FreeDV modes and analog passthrough. |
| Hold* | (none) | Powers up or shuts down ezDV. | |
| Hold* | PTT | When off, powers up ezDV in Hardware Test Mode (see Troubleshooting). | |
| Hold* | Volume Down | When off, powers up ezDV with default Wi-Fi settings (see Using the web interface). | |
| Volume Up | Press/Hold | (none) | Increases ezDV volume through headset. |
| Volume Down | Press/Hold | (none) | Decreases ezDV volume through headset. |
* Must be held for at least one second.
4 Using the web interface
ezDV provides a web interface to allow users to adjust its configuration and operate some of its features. When networking is enabled on ezDV, this interface is accessible through a regular web browser (such as Google Chrome or Microsoft Edge).
4.1 Accessing the web interface
By default, Wi-Fi on ezDV is disabled for security reasons. To enable it (or recover from a bad configuration), hold down the Mode and Volume Down buttons until ezDV turns on. This will cause ezDV to create an access point named “ezDV” followed by the last two octets of its MAC address. From there, you can connect your PC or mobile device to that network and open http://192.168.4.1/ in your web browser.
If ezDV is configured to connect to an existing Wi-Fi network (or Ethernet), you can open a web browser on a PC or mobile device connected to the same network as ezDV and enter ezDV’s IP address into the browser’s location box. This IP address can typically be found in your router’s listing of connected devices; ezDV will also beep the letter “N” followed by the last octet of the IP address when it connects to the network (for example, “N100” for “192.168.1.100”).
Alternatively, depending on your router, you can also use the configured hostname in your browser instead. By default, ezDV’s hostname is “ezdv”, which means that you can enter http://ezdv/ instead of its IP address.
Regardless of how you access ezDV’s web interface, you should see a page similar to the below:
From here, you can choose one of several tabs:
- General: Contains miscallenous ezDV configuration options.
- Reporting: Configures and operates the reporting feature, which controls reporting to FreeDV Reporter and PSK Reporter.
- Voice Keyer: Configures ezDV’s voice keyer feature.
- Network: Configures how ezDV connects to Wi-Fi.
- Radio: Configures how ezDV connects to your network-enabled radio.
- Firmware Update: Allows the user to perform a firmware update on ezDV.
4.2 Changing FreeDV mode
The web interface provides the ability to change the current FreeDV mode, similar to when pushing the Mode button on the top of ezDV. To change the current FreeDV mode, simply push one of the mode buttons in the General tab:

Once pushed, ezDV will behave identically as if the mode was switched using the Mode button, including beeping the current mode in Morse Code through the wired headset.
4.3 Changing LED brightness
ezDV allows you to change the brightness of the LEDs on the front of the device. This can make ezDV more comfortable to use at night (for example). This can be done by going to the General tab and moving the LED Brightness slider:

Changes to the LED Brightness slider take effect immediately and are preserved, so it’s not necessary to readjust every time ezDV is powered off and then on again.
4.4 Using and configuring the voice keyer
To activate and deactivate the voice keyer, you can push the Voice Keyer button in the General tab. When active, the Voice Keyer button will turn red as shown below:

Pushing the button again will turn off the voice keyer:

If the voice keyer feature is disabled, the Voice Keyer button will be grayed out. In order to configure the voice keyer, you will need to go into the Voice Keyer tab:
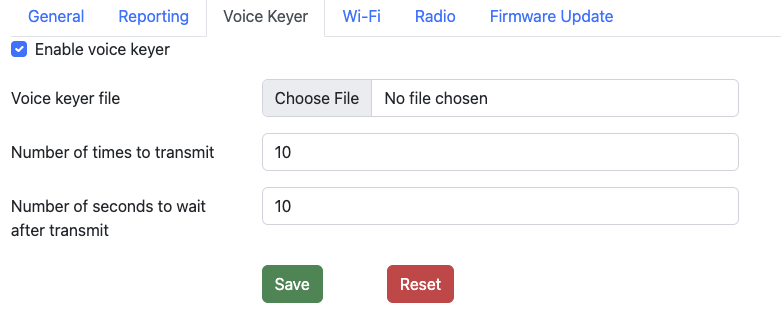
The following can be set here to enable the voice keyer feature:
| Setting | Description |
|---|---|
| Enable voice keyer | When checked, this enables use of the voice keyer. The Voice Keyer button in the General tab will be allowed to be pushed, as well as be able to be activated by pushing on the Mode button on the front of ezDV while holding down PTT. |
| Voice keyer file | Allows uploading of a new voice keyer file. Optional if one has already been uploaded to ezDV. Note: ezDV requires a WAV file encoded with a sample rate of 8000 Hz and containing only one audio channel. If a file is uploaded that does not meet these requirements, ezDV will reject the upload. |
| Number of times to transmit | The number of times that ezDV will transmit the voice keyer file before it disables the voice keyer. You can also disable the voice keyer early by pushing on the Voice Keyer button or pushing on any of the physical buttons on the front of ezDV. |
| Number of seconds to wait after transmit | The number of seconds to wait after transmitting the voice keyer file before starting another transmit cycle. |
Pushing Save will immediately update the voice keyer configuration and enable its use if desired.
4.5 Reporting to FreeDV Reporter/PSK Reporter
ezDV has the ability to report its current state to the FreeDV Reporter and PSK Reporter spotting services. Operation of this feature can be done through the Reporting tab:
When configured with a callsign and grid square, ezDV will automatically connect to FreeDV Reporter and PSK Reporter if it has access to an internet connection and is able to connect to a supported radio. You can also force a connection to both servies for radios without network support by checking the “Force reporting without radio connection” checkbox and manually entering the current frequency.
Once connected to FreeDV Reporter, a new row will appear corresponding to your connection:

If ezDV is able to decode a callsign from a received signal, it will transmit the received callsign and SNR to FreeDV Reporter and PSK Reporter. Your row will then update to indicate the received callsign, SNR and mode as well as highlight your row in a blue background for several seconds to alert others that you’ve receiving a signal. When ezDV is transmitting, FreeDV Reporter will also highlight your row with a red background to indicate to others that you’re transmitting.
With radios that support connections over the network, ezDV will also follow frequency changes on the radio and report them to FreeDV Reporter. FreeDV Reporter will then indicate your current frequency, allowing others to change to your frequency and potentially make a contact with you. Manual frequency updates (for those radios attached to ezDV with a wired connection) will also be sent to FreeDV Reporter as they’re made.
The following can be updated in the Reporting tab to operate reporting:
| Setting | Description |
|---|---|
| Your callsign | The callsign to report to FreeDV Reporter and PSK Reporter. This callsign is also transmitted as part of your FreeDV signal so that others can report receipt of your signal. |
| Grid square/locator | The 4-6 digit grid square to report to FreeDV Reporter/PSK Reporter. You can use a service such as this to calculate your grid square if not known. Note: Clearing this field disables reporting. |
| Message | A short message to display on the FreeDV Reporter website next to your callsign. This is transmitted solely on the internet, not over RF. |
| Force reporting without radio connection | When checked, ezDV will connect to FreeDV Reporter/PSK Reporter even without a valid radio configuration. |
| Current frequency (MHz) | When “Force reporting without radio connection” is checked, ezDV will transmit this frequency to FreeDV Reporter/PSK Reporter as your current frequency. |
Pushing Save will immediately connect or disconnect to FreeDV Reporter/PSK Reporter (as desired/required) as well as transmit updates to the current frequency or short message.
4.6 Configuring Wi-Fi
The Network tab allows configuration of ezDV’s Wi-Fi connection:
The following can be configured in this screen:
| Setting | Description |
|---|---|
| Enable Wi-Fi | Enables or disables the Wi-Fi radio on ezDV. |
| Hostname | The name to call ezDV on the network (default “ezdv”). Only letters, numbers and ‘-’ can be used for the name. |
| Wireless Mode | Can be either “Client” (to connect to an existing Wi-Fi network) or “Access Point” (to have ezDV generate its own Wi-Fi network). |
| Network Name | The Wi-Fi network to connect to in “Client” mode. ezDV populates this list with the networks that it’s able to see, or you can choose “(other)” and manually enter the name of the network in the “SSID” field. |
| SSID | Typically automatically filled in if you select a network in the “Network Name” list. If “(other)” is selected, you can manually enter the name of the Wi-Fi network here (for example, if the network doesn’t broadcast its presence). |
| Security Type | In “Access Point” mode, controls the security of the Wi-Fi network ezDV provides. Can be either “Open” (no encryption/security) or one of “WEP”, “WPA”, “WPA2” or “WPA/WPA2”. Note: WPA2 is recommended for the best security. |
| Channel | In “Access Point” mode, this controls the 2.4 GHz Wi-Fi channel (1-11) ezDV uses. |
| Password | In “Access Point” mode (and when something other than “Open” is selected for “Security Type”), the password ezDV will require to allow other devices to connect to it. In “Client” mode, this is the password for the network selected or entered in “Network Name”/“SSID”. |
Pushing Save here will save these settings to ezDV’s internal flash but require rebooting or power cycling ezDV for the settings to take effect.
4.7 Configuring radio connection and headset
The Radio tab allows configuration of ezDV’s connection to a network-enabled radio as well as headset-related functions. Currently ezDV supports connections to the Icom IC-705 and Flex 6000/8000 series radios, as shown below:
The following can be configured in this screen:
| Setting | Description |
|---|---|
| Enable PTT using headset button | Enables the usage of the “call” button on your wired headset for toggling PTT. (See Basic usage" for more information.) |
| Time Out Timer (seconds) | Configures ezDV’s “time out timer”, which automatically puts the radio back into receive if the radio is stuck in transmit mode for too long. |
| Use Wi-Fi Network for Radio RX/TX | When checked, allows ezDV to connect to a supported radio over the network instead of using a wired headset. |
| Radio Type | The type of radio that ezDV should connect to. This can be either “Flex 6000/8000 series” or “Icom (e.g. IC-705)”. Relevant settings for each radio type will appear in this tab as appropriate. |
| Radio | Displays the list of Flex radios that ezDV is able to see on the network. You can also choose “(other)” and manually enter its IP address. |
| IP Address | For Flex radios, this is typically auto-filled when selecting a radio from the Radio list. Otherwise, this is the IP address of the radio which to connect to. |
| Port | For the IC-705, this is the control port number of the built-in server running on the radio. Defaults to “50001” and should not normally need to be changed. |
| Username | For the IC-705, this is the “Network User1” or “Network User2” user ID. (See Configuring Wi-Fi on the IC-705 or your radio’s user manual for information on configuring these users.) |
| Password | For the IC-705, this is the “Network User1” or “Network User2” password. |
Pushing Save here will save these settings to ezDV’s internal flash but require rebooting or power cycling ezDV for the settings to take effect.
4.8 Updating firmware
From time to time, new ezDV firmware may be released that contains feature enhancements and/or bug fixes. These updates are typically posted on the project’s releases page and are announced in various other locations (such as the FreeDV mailing lists). ezDV can be upgraded or downgraded by using the “Firmware Update” tab:

To update the firmware, perform the following steps:
- Download the firmware file ending in “-ota.tar.gz” to your PC and save it to a known location (such as your Downloads folder).
- Go to ezDV’s “Firmware Update” tab and select the file you just downloaded.
- Press the “Update” button. Note: this may take several minutes to complete. Do not close your browser or navigate away from the ezDV web interface while the update is taking place.
Once complete, the new firmware is stored on ezDV’s internal memory but will not take effect until ezDV is turned off and on again or rebooted.
4.9 Rebooting ezDV
You can reboot ezDV from the web interface instead of powering it on and off using the physical controls. This is typically done after saving radio or Wi-Fi settings or after uploading new firmware. To do this, go to the General tab and press the Reboot button:

ezDV may take up to a minute to turn itself off and then turn itself on again. Once the web browser is able to communicate with ezDV again, it will automatically refresh the Web interface so that any changes to it due to any firmware updates can be made visible immediately.
Note: changes to Wi-Fi settings may cause ezDV to no longer be accessible on the IP address that was originally used. See Accessing the web interface for information on finding its new address if required.
5 Troubleshooting
This section contains some helpful tips and information that may help you diagnose and fix any problems you may have with ezDV.
5.1 Using Hardware Test Mode
ezDV has a hardware test mode that can be used to ensure that the board is functioning properly. To access this mode, hold down the PTT button while turning on ezDV. Once ezDV starts, you will hear audio tones at 1275 Hz (user jack) and 1725 Hz (radio jack) and all LEDs will be lit at 50% duty cycle. If the board is functioning properly, only the frequency associated to the given jack (and harmonics, if square wave) will be in the output audio. Pushing the Mode button will cycle through the following:
- Sine tones at both jacks.
- Sine tone only on user jack.
- Sine tone only on radio jack.
- Square tones at both jacks.
- Square tone only on user jack.
- Square tone only on radio jack.
- No audio on either jack.
Additionally, pushing any of the buttons will extinguish the following LEDs if the buttons are properly functioning:
- PTT: PTT (red)
- Mode: Sync (green)
- Volume Up: Overload (red)
- Volume Down: Network (blue)
Releasing the button will re-illuminate the associated LED.
To shut down ezDV while in this mode, long-press the Mode button as with regular operation.
5.2 Resetting ezDV
In the event that ezDV is non-responsive and needs to be reset, you can open the ezDV enclosure to gain access to two buttons that are hidden in normal use. These are the Reset and Flash buttons as shown below:
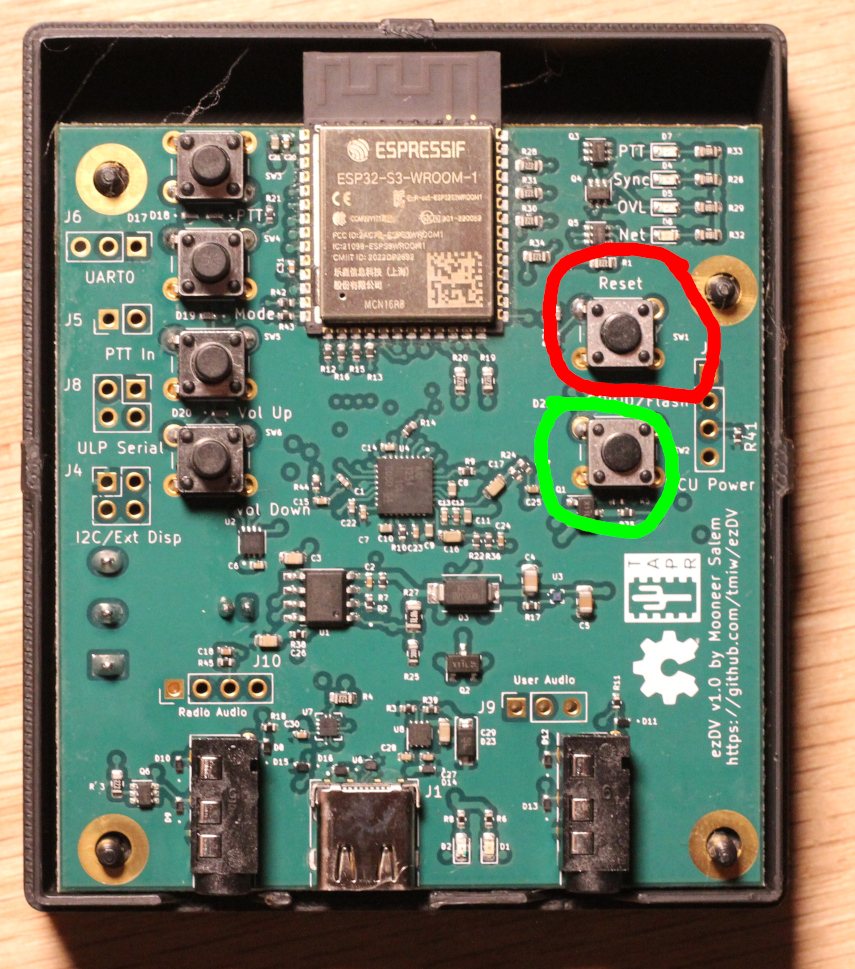
Pressing and releasing the Reset button will cause ezDV to restart execution of its firmware. If the Flash button is held while pressing and releasing the Reset button, the ESP32-S3 on ezDV will enter into “firmware download mode”, which will allow you to clear ezDV’s internal memory and allow you to load a new copy of its firmware. To do this, you will need to plug ezDV into a USB port on your PC and either install esptool, ESP-IDF or ESP Flash Tool onto your PC’s hard drive.
5.2.1 Using ESP-IDF to flash firmware
Download a copy of the ezDV firmware source code (typically listed as “Source code (zip)” or “Source code (tar.gz)” on the project’s release page). Decompress the file, change into the folder that is created, then run the following commands to build and flash the firmware:
. ~/esp/esp-idf/export.sh
cd firmware
idf.py -p /dev/ttyxxx0 build erase-flash flash
Where /dev/ttyxxx0 (or COMx: on Windows) is the serial port created by your operating system after plugging ezDV in. Once complete, ezDV will automatically reboot and execute the firmware that’s been flashed.
Note: The above will erase all of your settings and reset them to defaults. If you don’t want to do this, remove erase-flash from the above command.
5.2.2 Using ESP Flash Tool
On Windows, you can use the ESP Flash Tool to flash ezDV. This does not require installation of ESP-IDF.
- Download the ESP Flash Tool from https://www.espressif.com/en/support/download/other-tools.
- Decompress all of the files in the ZIP file and execute flash_download_tool_3.9.3.exe.
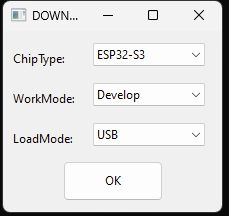
- Select “ESP32-S3” for “ChipType”, “Develop” for “WorkMode” and “USB” for “LoadMode” as shown below:
- Add rows for each of the .bin files in the resulting screen:
| File Name | Offset |
|---|---|
| bootloader.bin | 0x0 |
| partition-table.bin | 0x8000 |
| ota_data_initial.bin | 0xF000 |
| ezdv.bin | 0x20000 |
| http_0.bin | 0x7F8000 |
Additionally, check each of the checkboxes to the left of the file name. It should look something like this, with each of the rows having a green background:
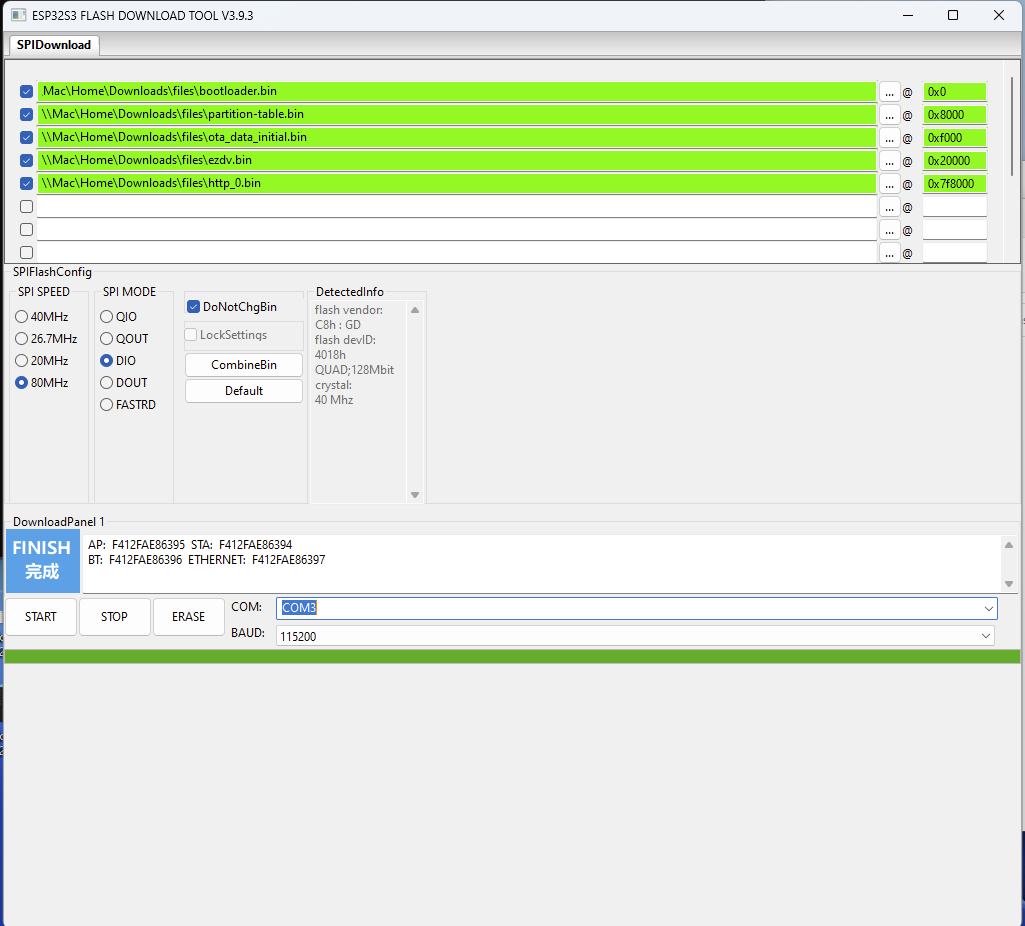
Set “SPI SPEED” to “80 MHz” and “SPI MODE” to “DIO”.
Plug ezDV into your computer using a USB-C cable. Device Manager should show a new COM port named “USB/JTAG serial debug unit” or similar. Enter this COM port into the “COM” field in the application.
(Optional) Push the ERASE button. This will show a green “SYNC” indicator for a bit followed by “Download” and then “FINISH” as per the above screenshot. Note: There will be no firmware installed on the board once this step finishes. You will need to reconfigure ezDV after new firmware has been flashed.
Push the START button. This will go through the same indicators as step 1 but this time will also have a progress bar indicating how far it’s gotten in flashing the new software.
Push the STOP button and then close the application. Open the ezDV enclosure and briefly push/release the “Reset” button on the right hand side of the board. If everything went well, you’ll see the four LEDs light up for a few seconds indicating that ezDV is booting normally.
5.2.3 Using esptool
You can also use esptool. For example:
esptool esp32s3 -p /dev/cu.usbmodem14101 -b 460800 --before=default_reset --after=hard_reset write_flash --flash_mode dio --flash_freq 80m --flash_size detect 0x0 bootloader.bin 0x20000 ezdv.bin 0x8000 partition_table/partition-table.bin 0xf000 ota_data_initial.bin 0x7f8000 http_0.bin5.3 Common problems
| Problem | Suggested Solutions |
|---|---|
| No audio coming in via headset | * Use the Volume Up button to increase ezDV’s volume. * Plug headset into another device and verify that you can hear audio. * Change ezDV mode to “ANA” (analog passthrough) and verify audio is coming from radio. |
| ezDV unable to connect to Wi-Fi network | * Place ezDV closer to router/access point. * Turn on ezDV while holding Volume Down and verify configuration in the web interface. |
| ezDV unable to connect to network-enabled radio (e.g. Flex radio or Icom IC-705) | * Make sure that ezDV is connected to the correct Wi-Fi network (blinking blue LED). * Verify correct radio configuration in the web interface. * Place ezDV and/or radio closer to router/access point (if possible). * Power cycle/reboot ezDV and/or radio. |
| ezDV does not put the radio into transmit | * Verify wiring of radio interface cable * Verify that ezDV is properly connected to its configured network-enabled radio. |
| ezDV is overdriving radio/amplifier on transmit (i.e. ALC is indicating) | * Use Volume Down button while transmitting to reduce transmit power level. * Verify power settings on radio. |
| Radio is not transmitting audio from ezDV | * Use Volume Up button while transmitting to increase transmit power level. * Verify that current radio mode uses audio from ezDV (for example, putting radio into “data” mode). * Verify that ezDV is connected to the radio (if network-enabled). |
| ezDV is not connecting to FreeDV Reporter | * Verify that ezDV is connected to Wi-Fi network with internet access. * Verify that callsign and grid square are configured in ezDV. * Verify that ezDV is connected to network-enabled radio (solid blue LED). * Verify that “Force reporting without radio connection” in web interface is enabled (if not using a network-enabled radio). |
| ezDV is not reporting to PSK Reporter | * Verify that ezDV is connected to Wi-Fi network with internet access. * Verify that callsign and grid square are configured in ezDV. * Verify that ezDV is connected to network-enabled radio (solid blue LED). * Verify that “Force reporting without radio connection” in web interface is enabled (if not using a network-enabled radio). |
| ezDV web interface only partially loads | * Use web browser’s “reload” button to refresh the web interface. * Move ezDV closer to router/access point or the PC/mobile device being used. |
| Multiple “FDVU” modes display in SmartSDR | ezDV likely briefly lost connection to the radio. This does not normally cause problems* but you can power cycle your Flex radio to clean up the extra modes if needed. |
* A known issue in the Flex radio firmware causes the radio to crash if ezDV attempts to unregister itself. To avoid the crash, ezDV’s unregistration logic has been disabled. This logic will be reenabled at a future date.
5.4 Getting assistance
If you have a problem that is not already covered in this manual, you can obtain help through several sources:
- digitalvoice mailing list: This is the official FreeDV mailing list covering the FreeDV mode generally as well as FreeDV software and hardware devices such as ezDV.
- GitHub: You can create a GitHub issue to report bugs or request feature enhancements. Note that this requires a GitHub account.
6 Appendix: Configuring Wi-Fi on the Icom IC-705
First, you will need to decide whether you want to join your IC-705 to an existing Wi-Fi network or whether you want to configure ezDV to use the IC-705’s built-in access point.
Note: it is recommended to join your IC-705 to an existing Wi-Fi network in order to be able to access ezDV’s Web interface (and to take advantage of certain features if an Internet connection is available).
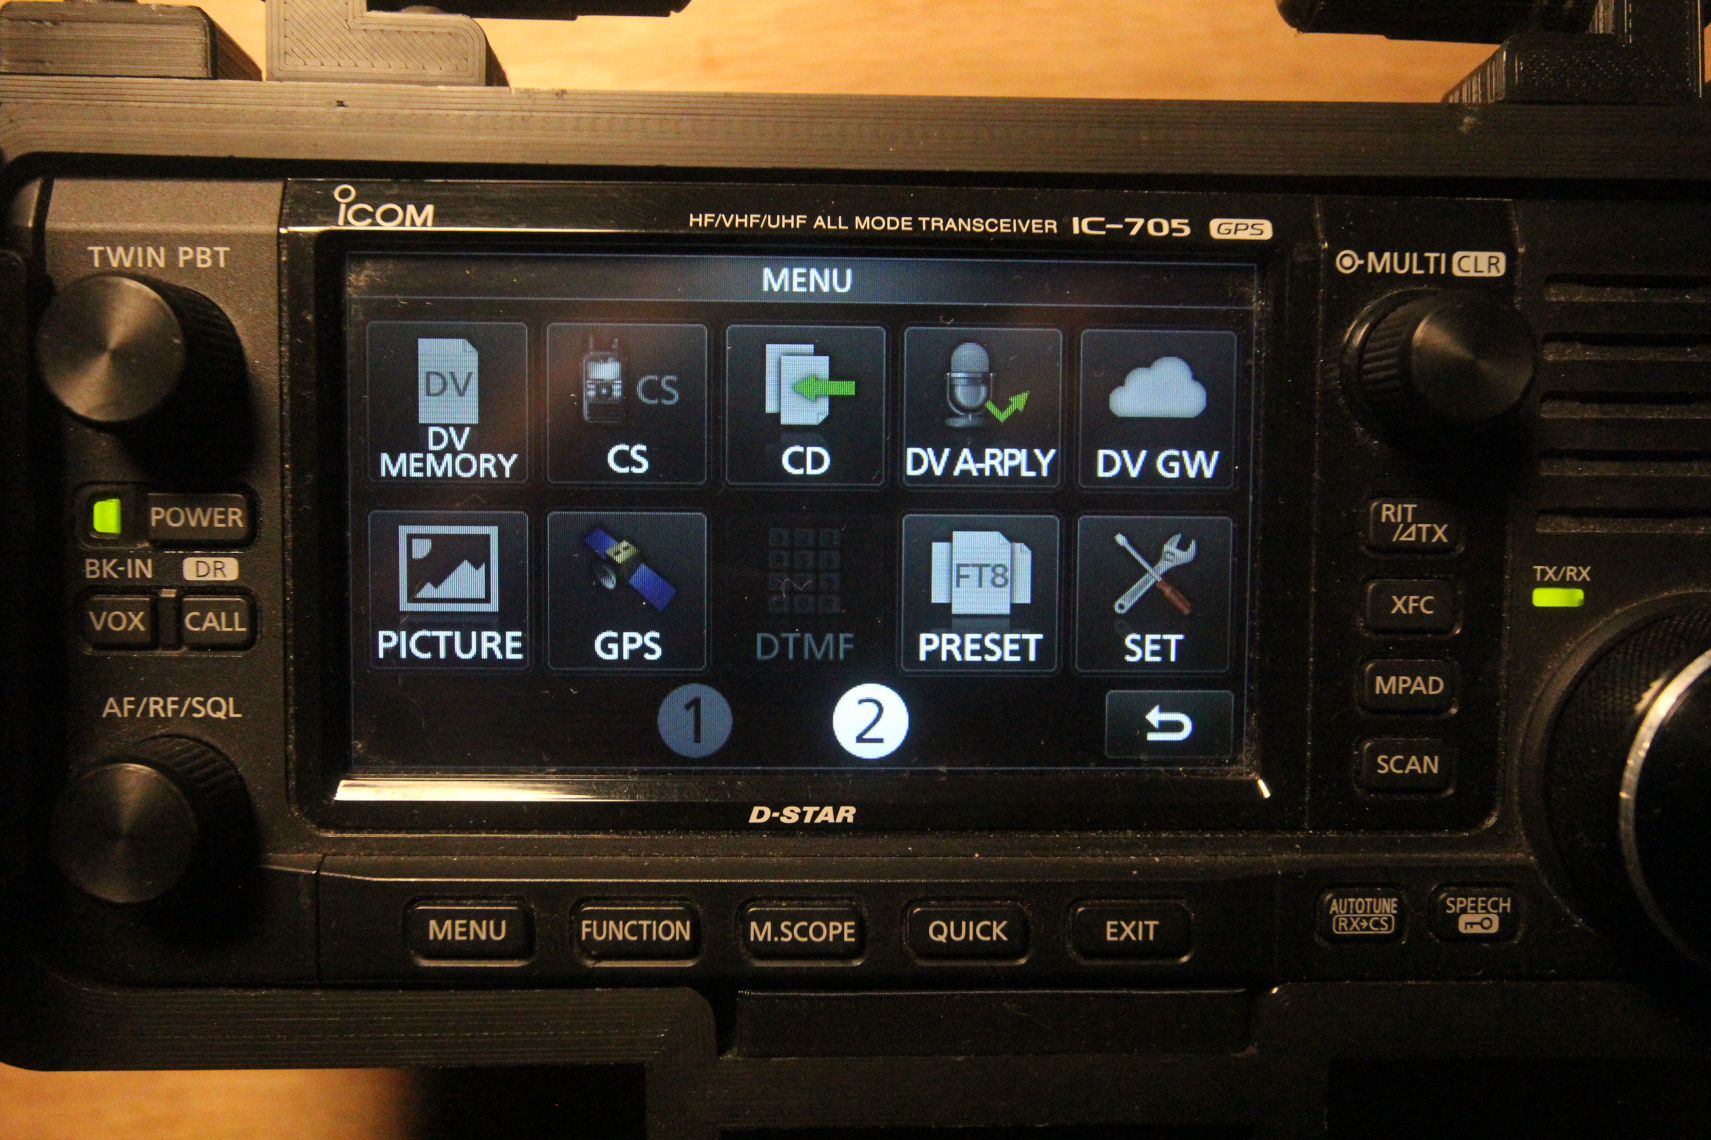
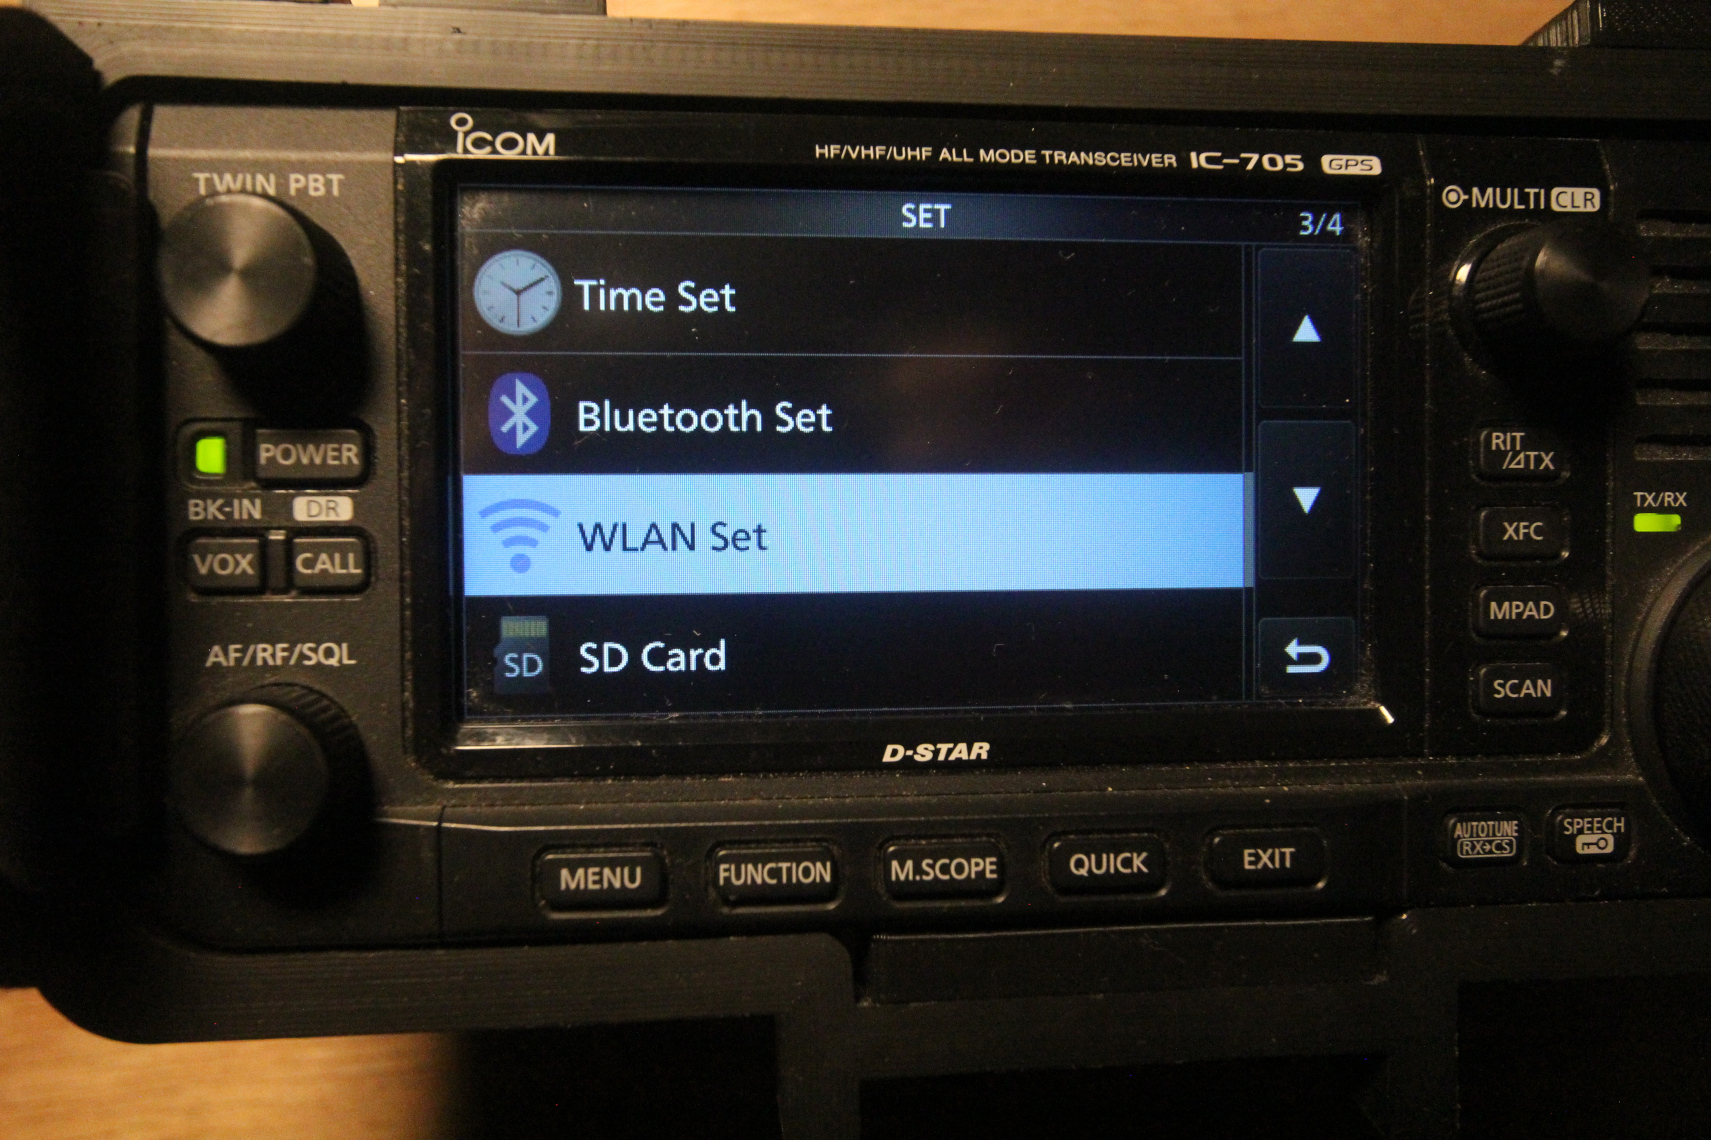
Next, you’ll need to turn on your radio and push the Menu button. This will bring up the following screen:
Tap the Set button on the lower-right corner of the display and then select “WLAN Set” as shown below:
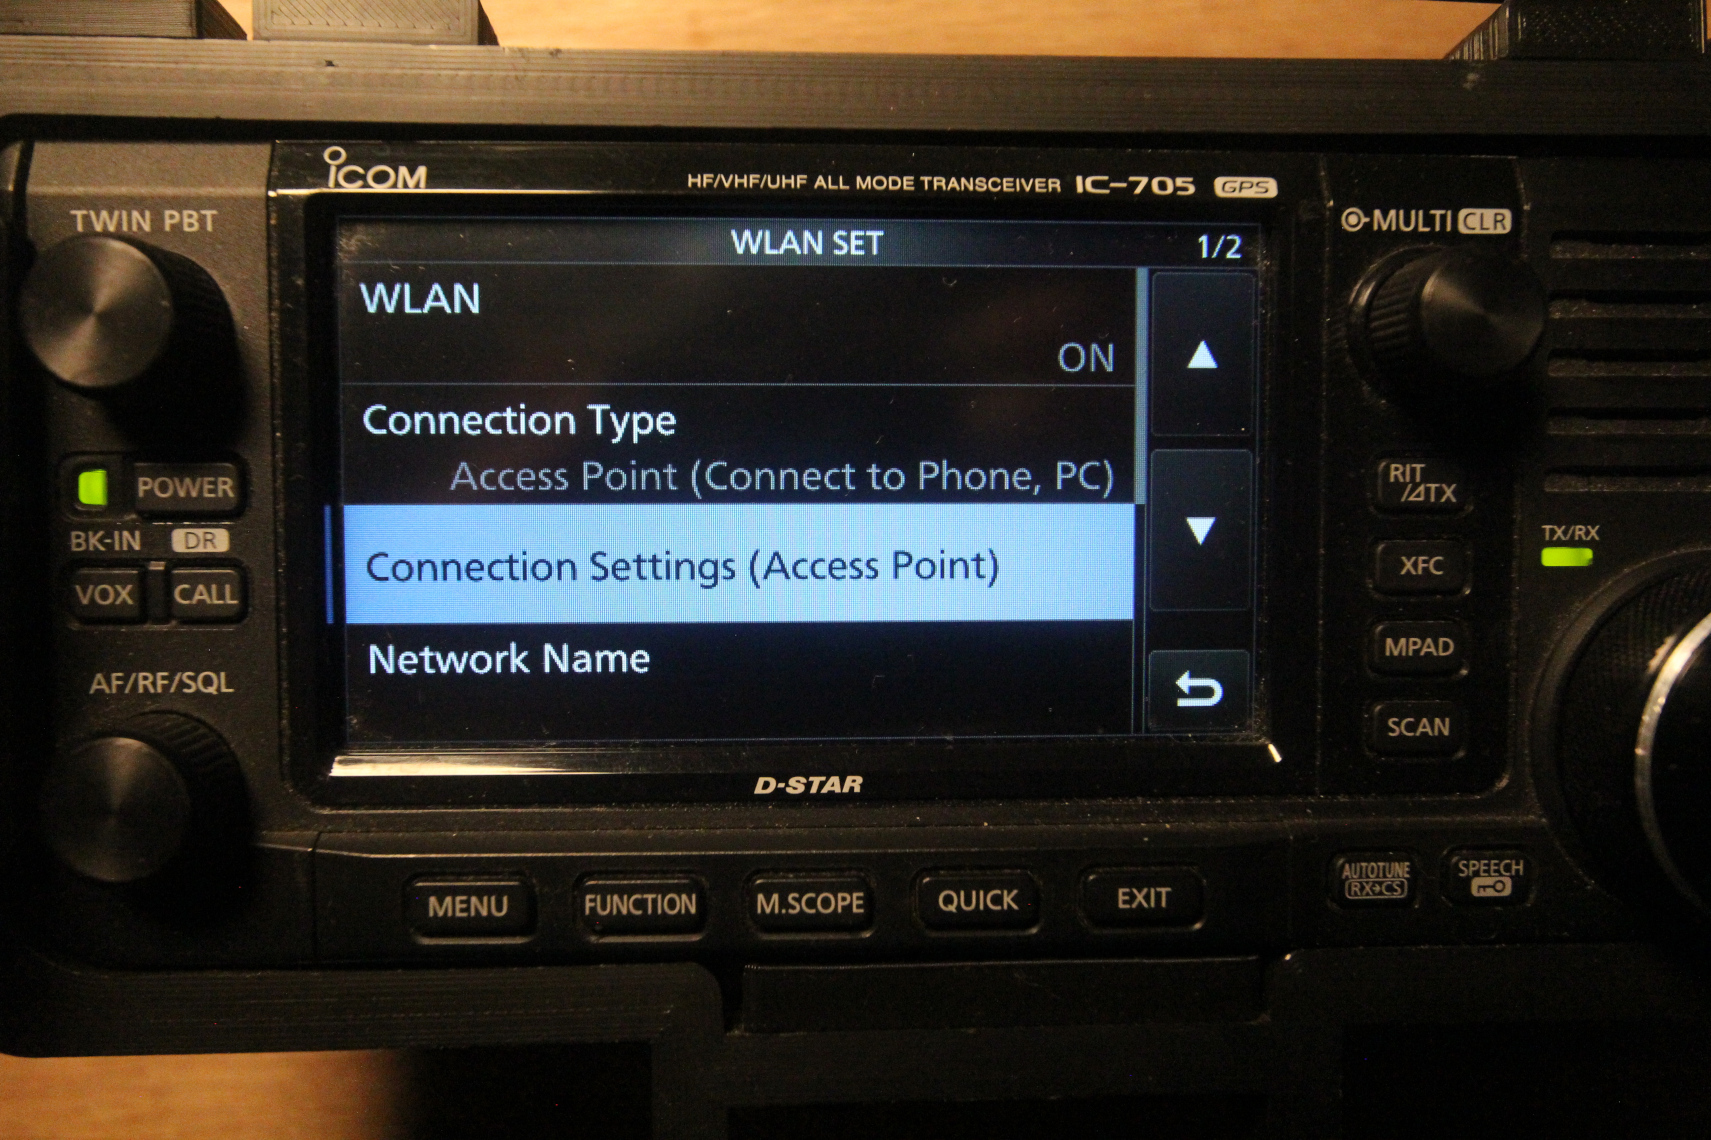
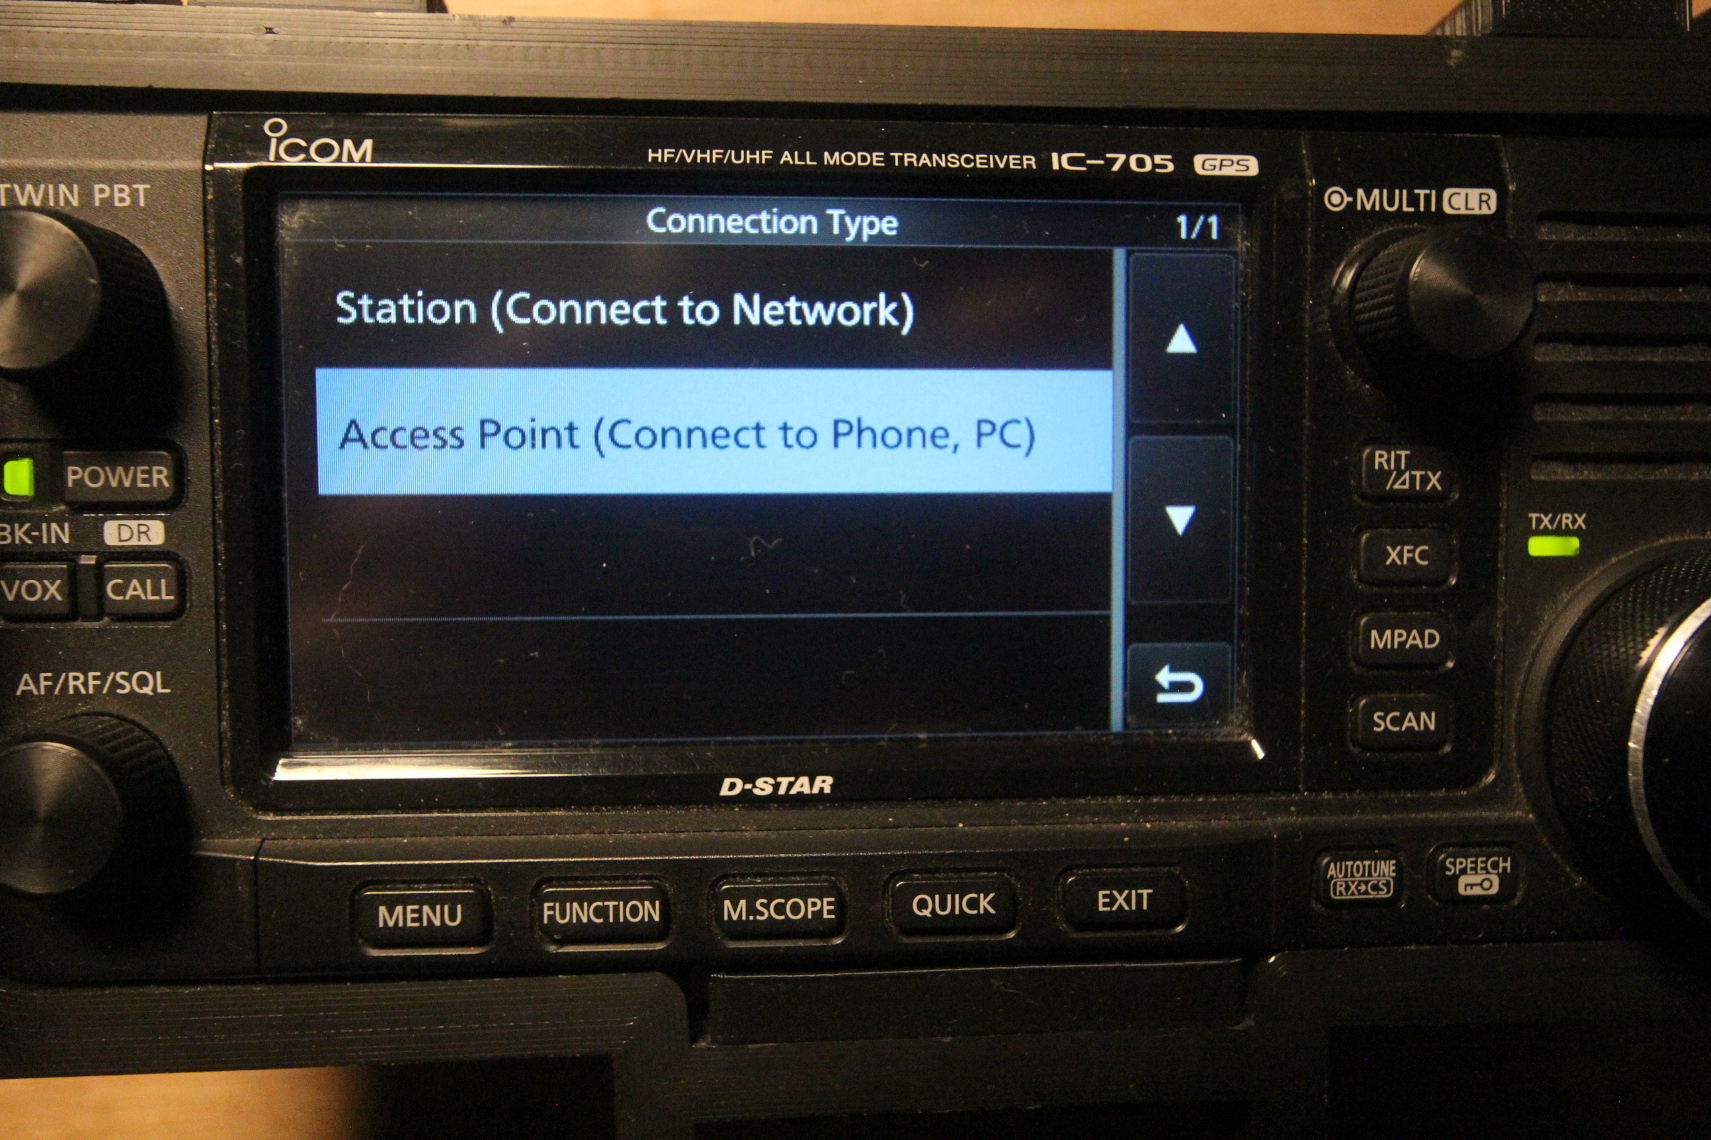
Next, tap the WLAN option on the first page and turn it OFF. Once switched OFF, tap the Connection Type setting and tap either Station (for connecting to an existing Wi-Fi network) or Access Point (for connecting ezDV to the IC-705’s access point):
6.1 Using the IC-705’s built-in access point
If you’re using the IC-705’s Access Point mode, it is a good idea to double-check your radio’s SSID (aka Wi-Fi network name) and Wi-Fi password by tapping “Connection Settings (Access Point)” and then tapping each option as shown below, updating them as needed:
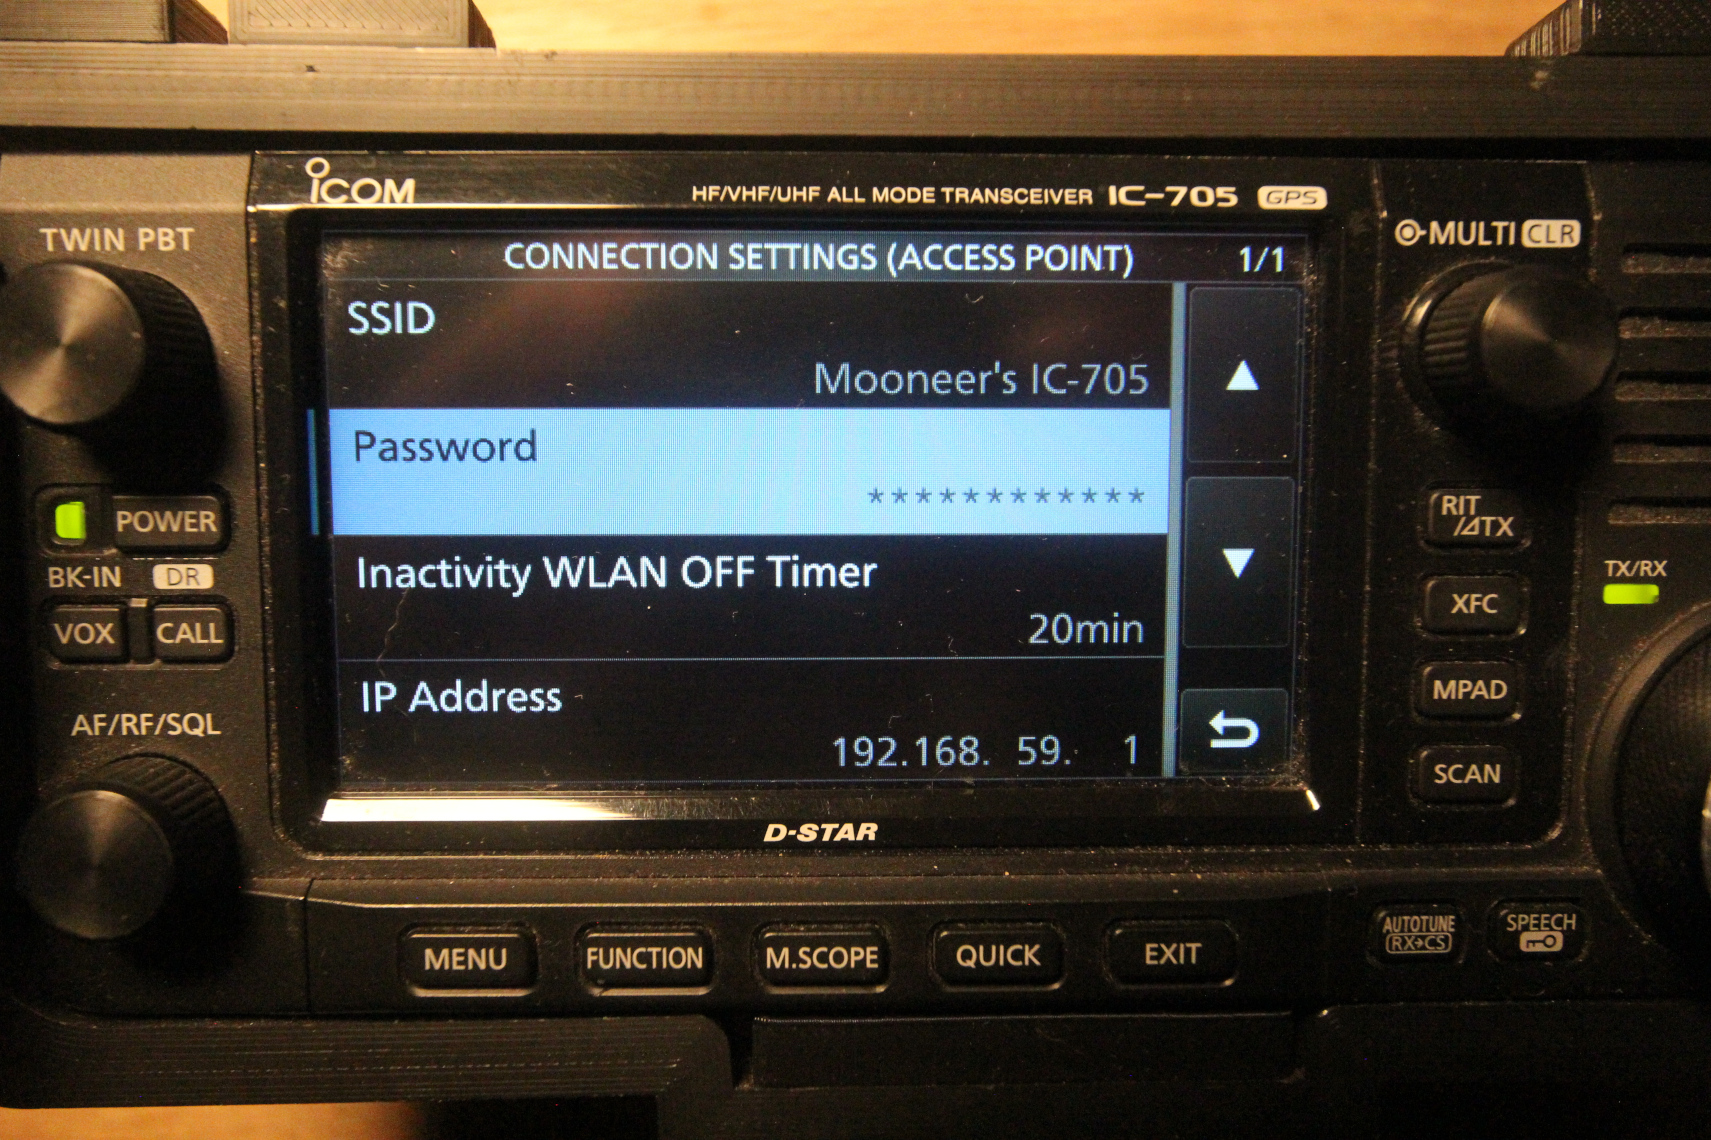
Also, note the IP address that your IC-705 is using on this page as you will need it for later configuration of ezDV. Once the settings here are satisfactory, tap the Back button on the lower right hand corner of the screen, tap the WLAN option and then change it to ON.
6.2 Connecting the IC-705 to an existing network
First, tap the WLAN option on the WLAN Set page and change it to ON. This is needed in order to turn on the Wi-Fi radio in the IC-705 and allow it to scan for networks.
Next, tap “Connection Settings (Station)”. You will see the following page on the IC-705:
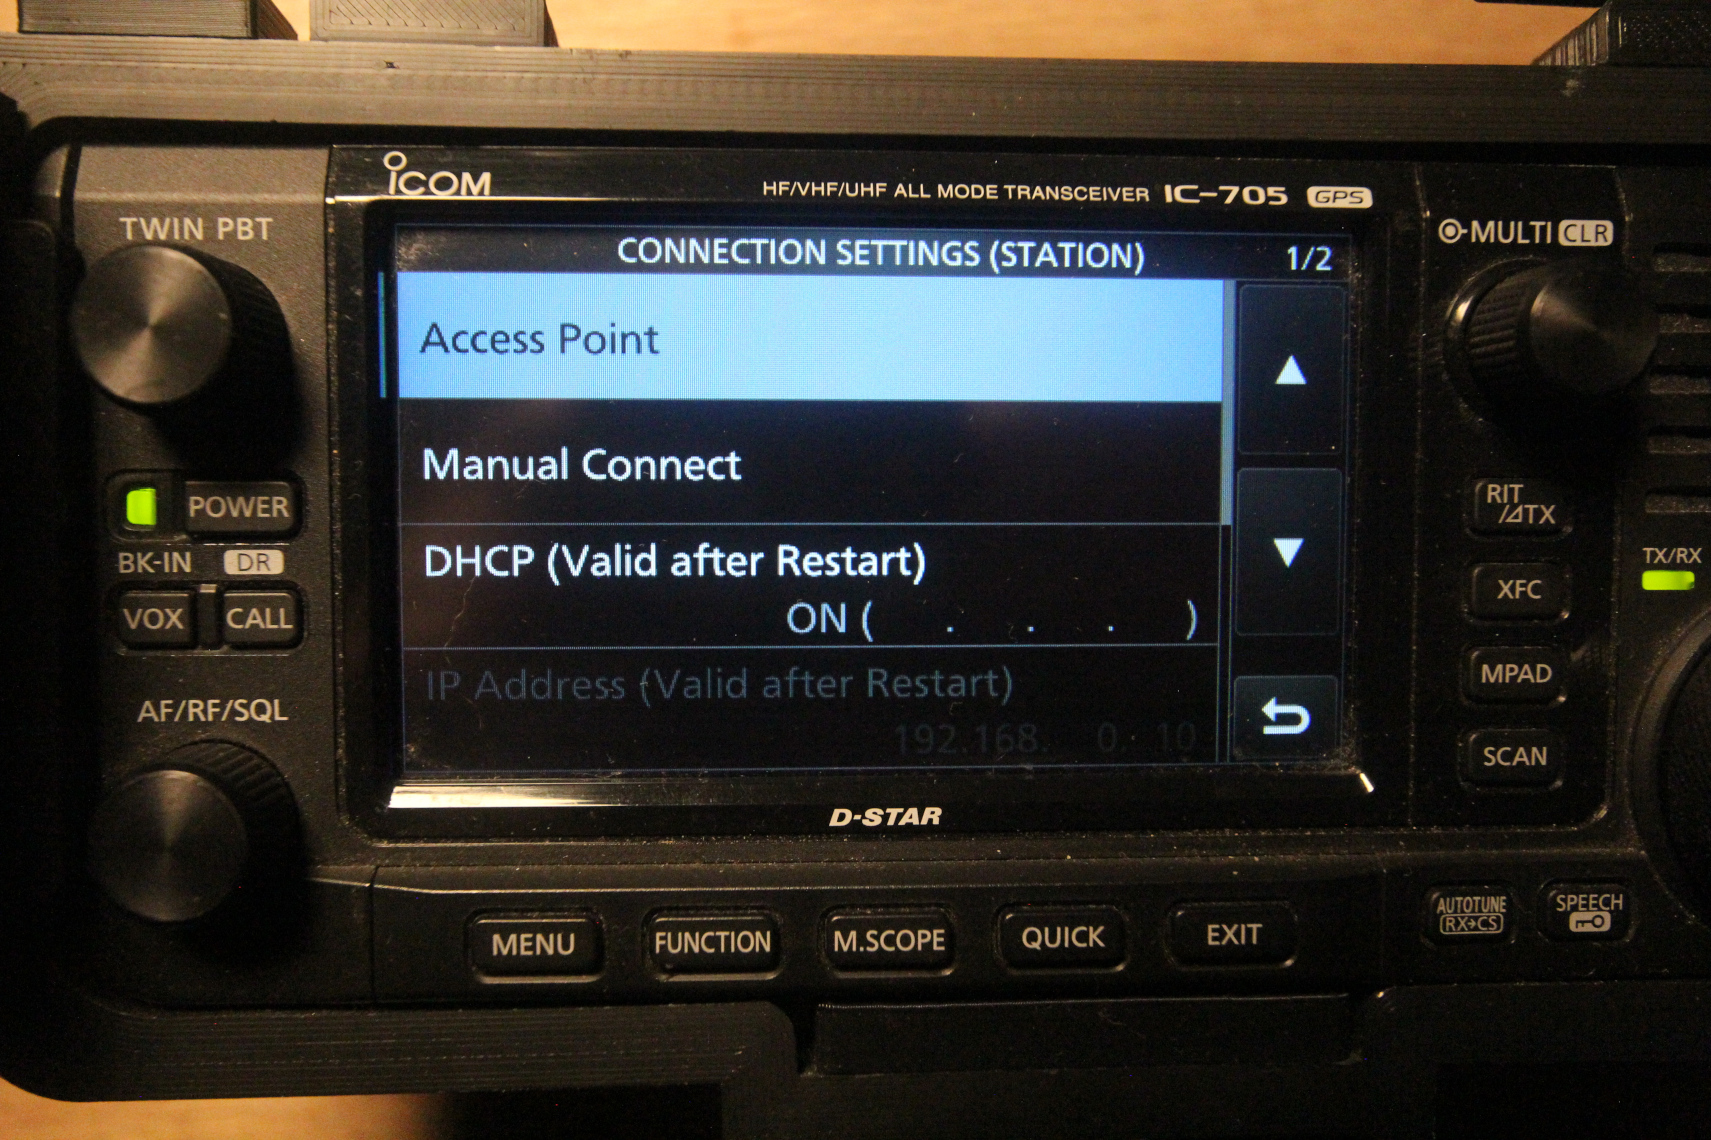
From here, you can either tap “Access Point” to select your network from a list or “Manual Connect” if it’s not broadcasting its name. Tapping “Access Point” will bring up a page similar to the following:
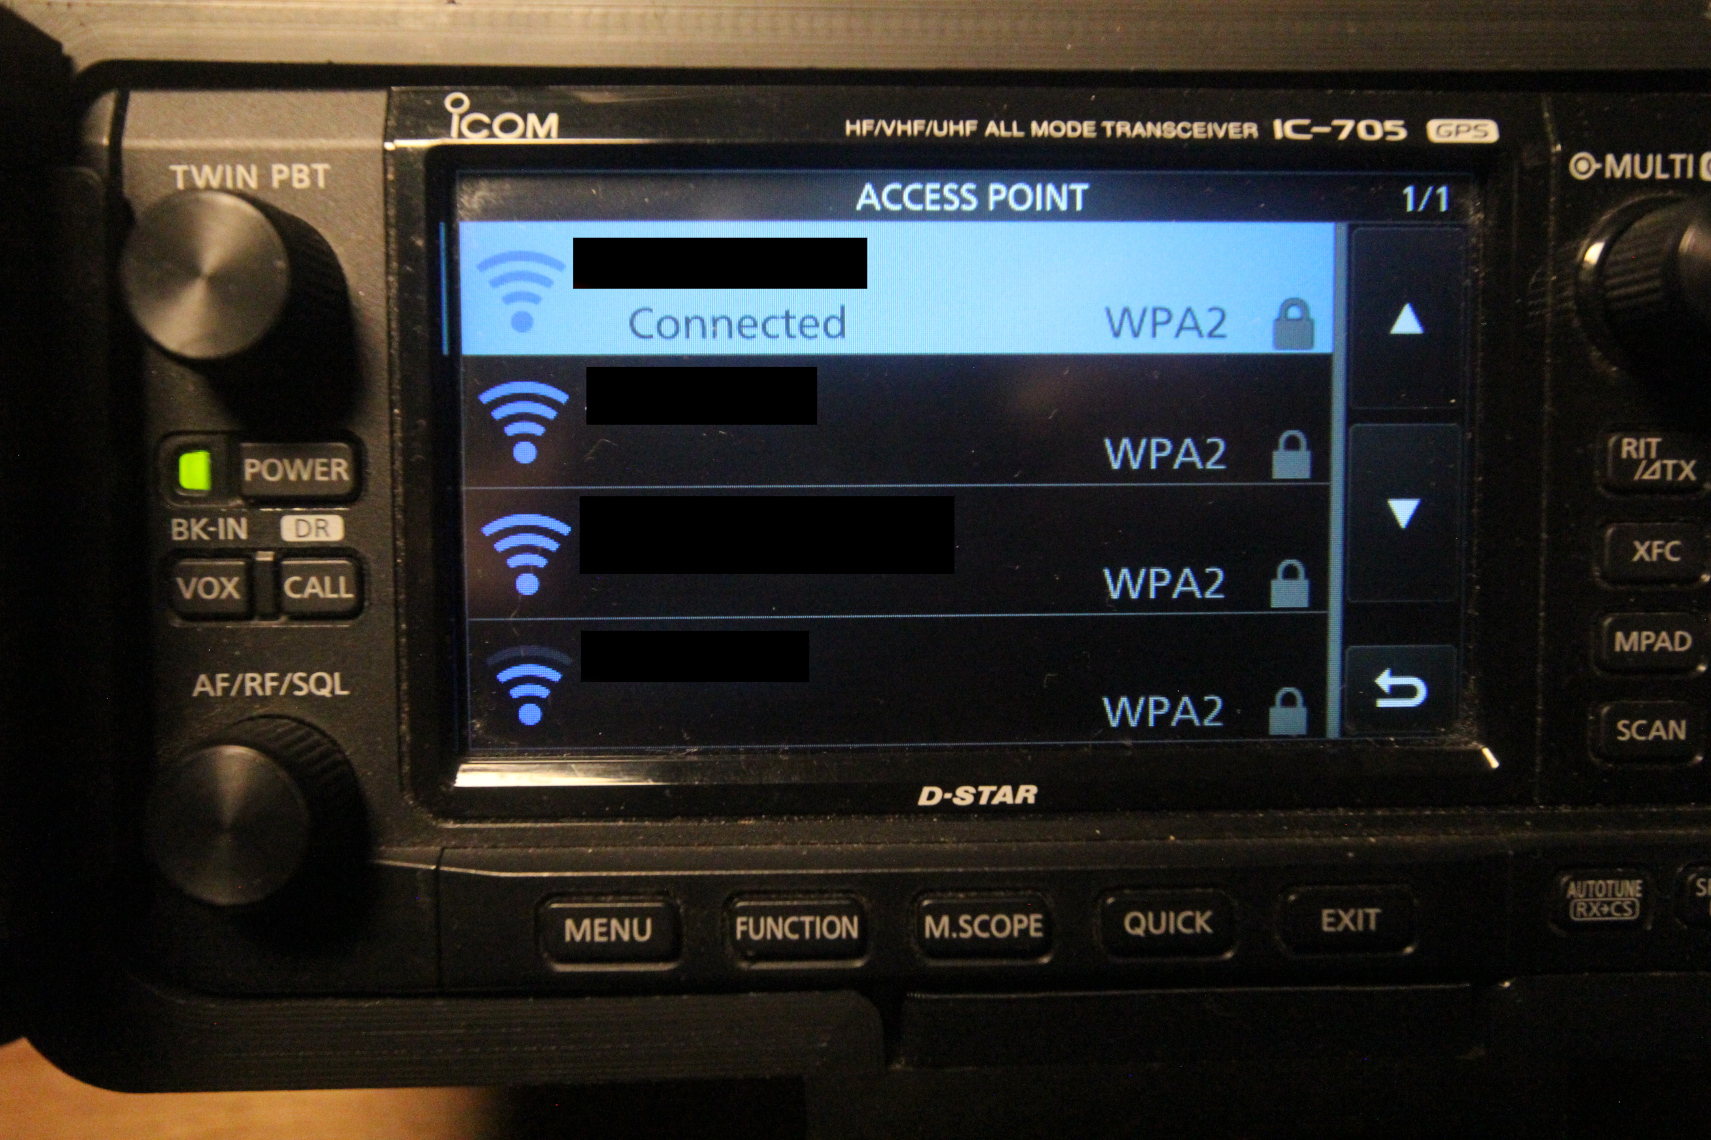
Tap your preferred network from the list that appears. If it’s not already saved in the IC-705, you may see a page similar to the following:
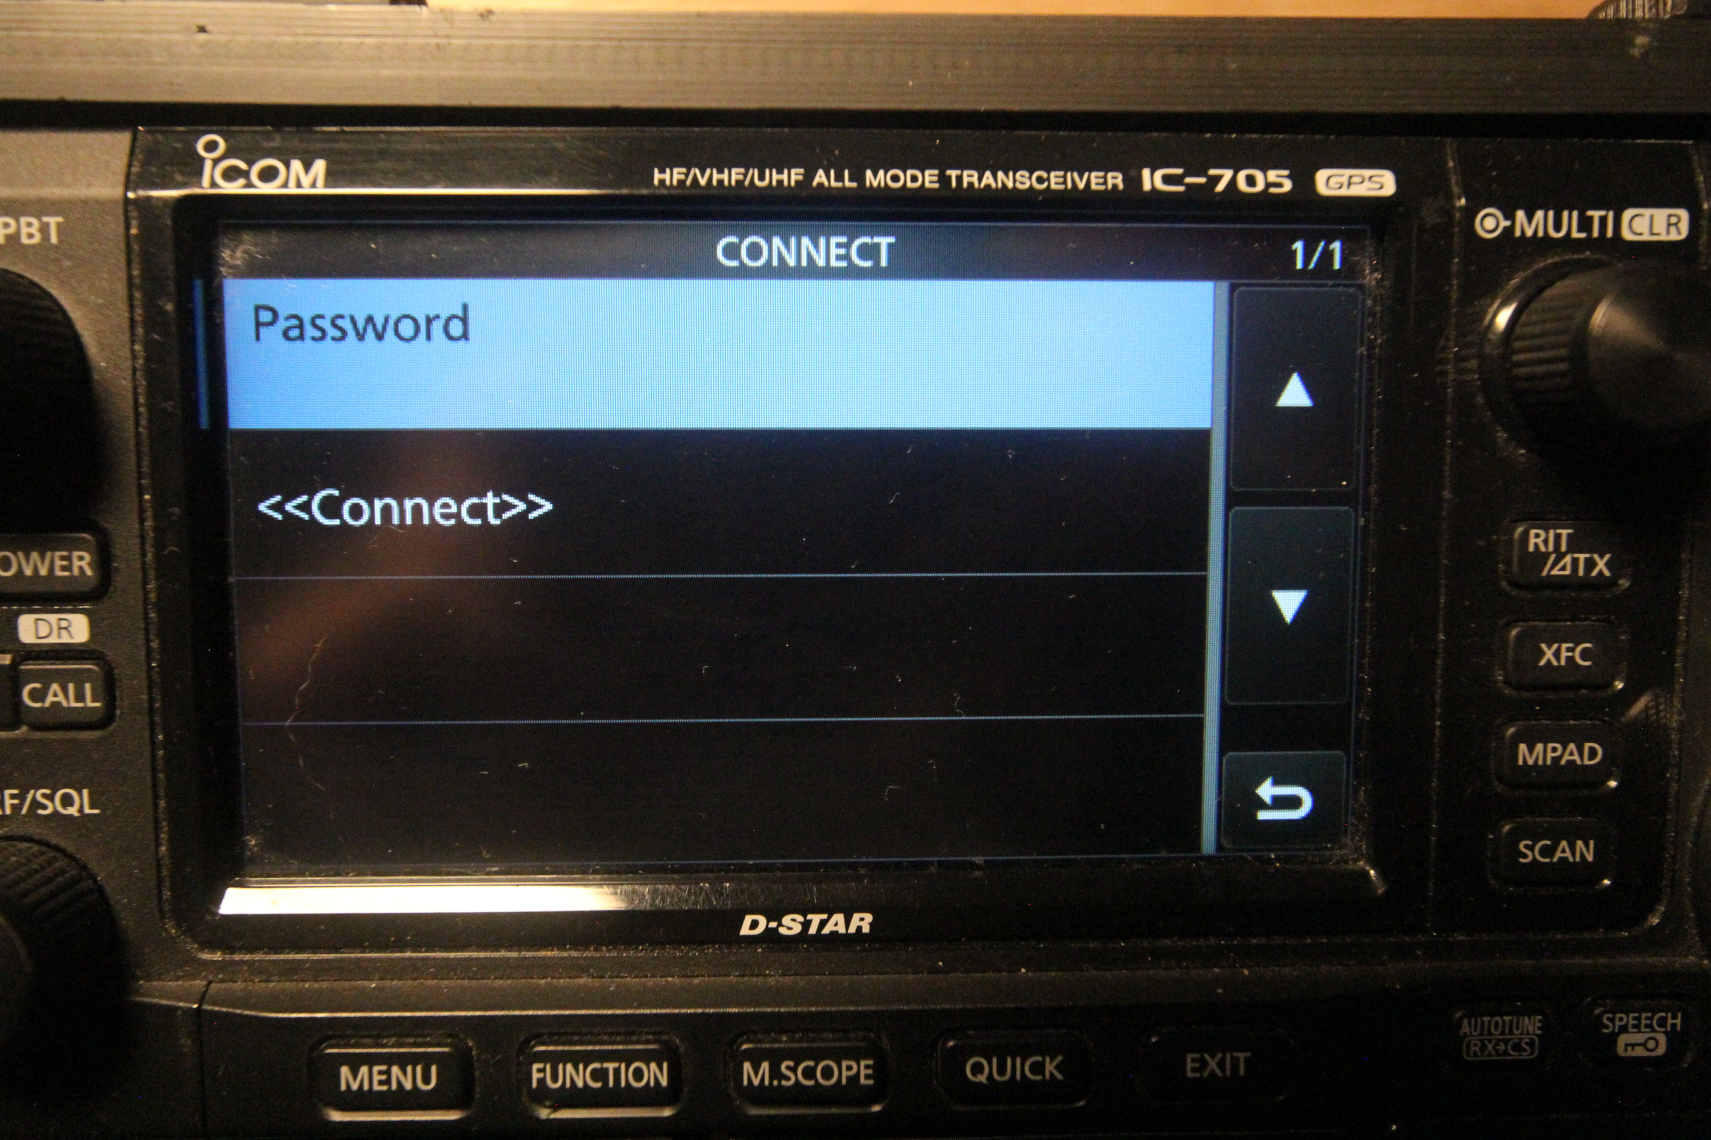
Tapping Password will display the following page that will allow you to enter your Wi-Fi network’s password:

Once entered, tap the ENT button to save it, then tap the Connect option to connect to the network. If successful, the Access Point page will show “Connected” below your network’s name. Tap the Back button until you return to the “Connection Settings (Station)” page and make sure you see an IP address under “DHCP (Valid After Restart)”:
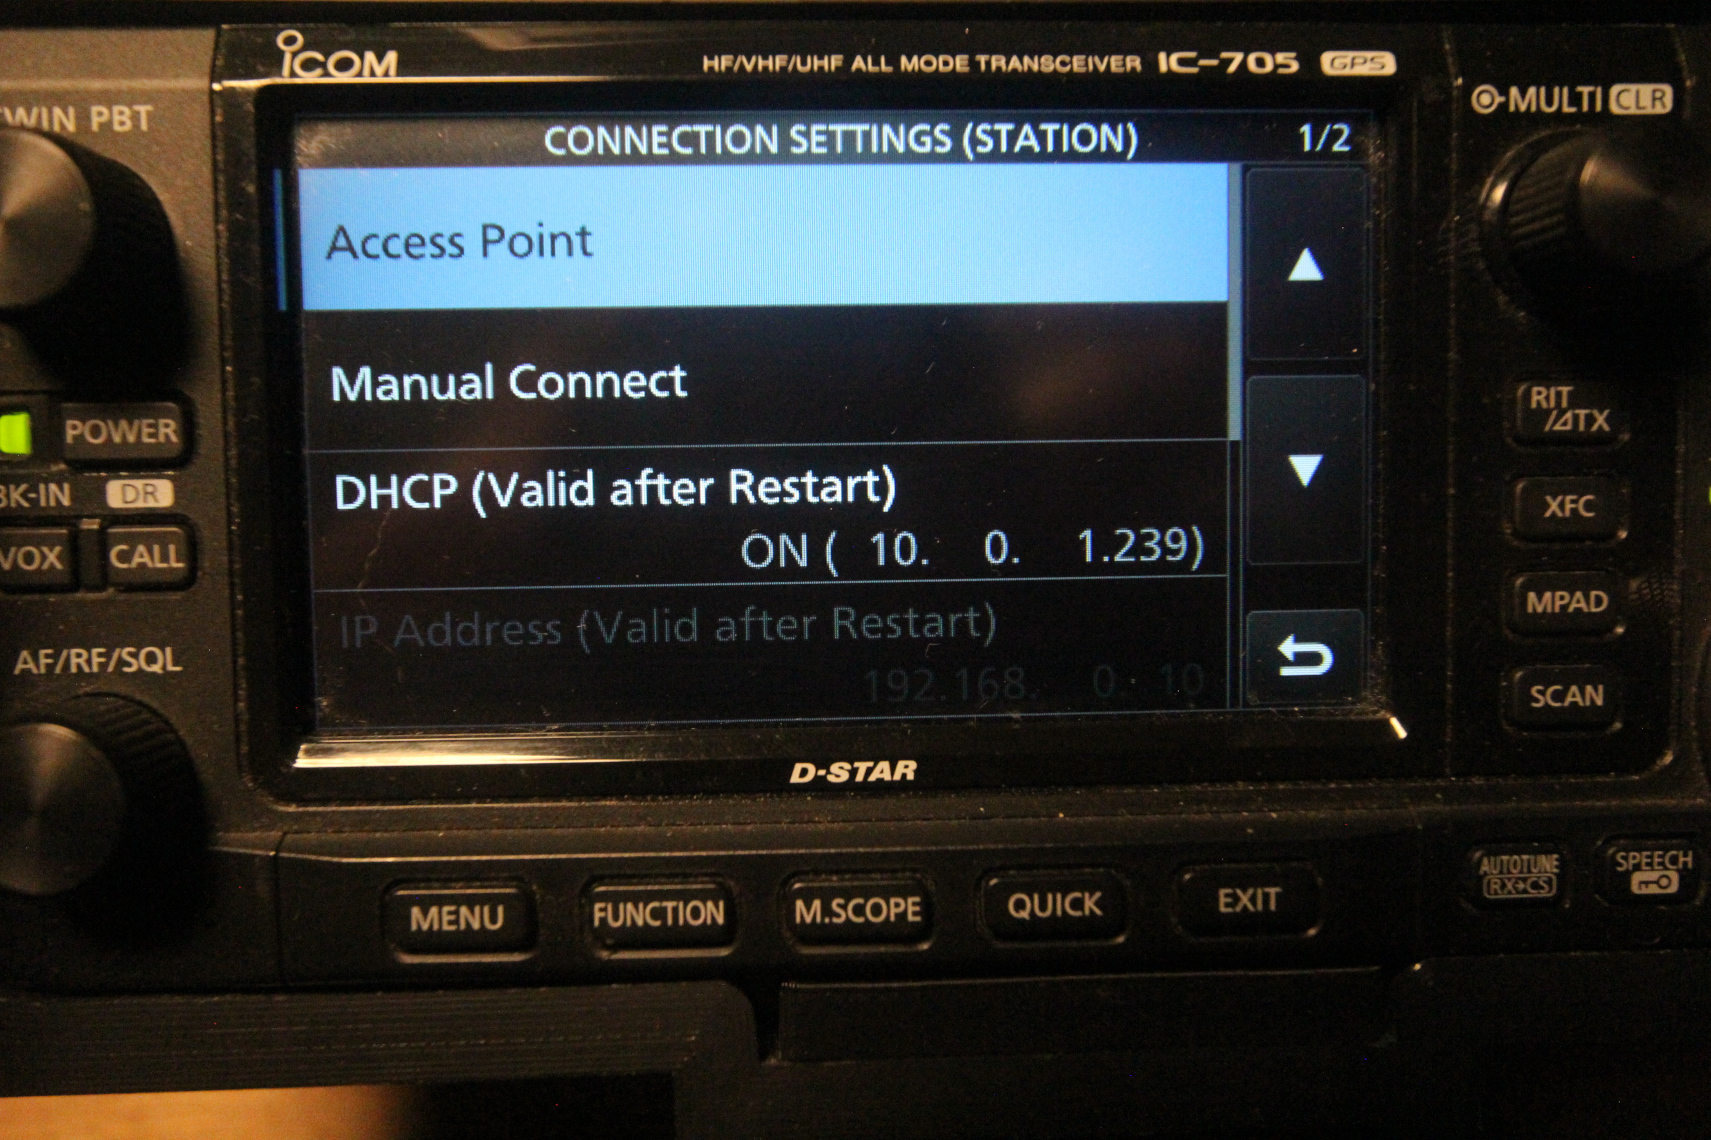
Note this address as it will be needed for later configuration of ezDV.
6.3 Configuring the Radio User
The IC-705 requires a username and password to connect to the radio. If this is not already set up, you will need to do so now before continuing with ezDV setup. First, ensure that you’re on the “WLAN Set” page and then go to the second page of options. You will see a “Remote Settings” option:
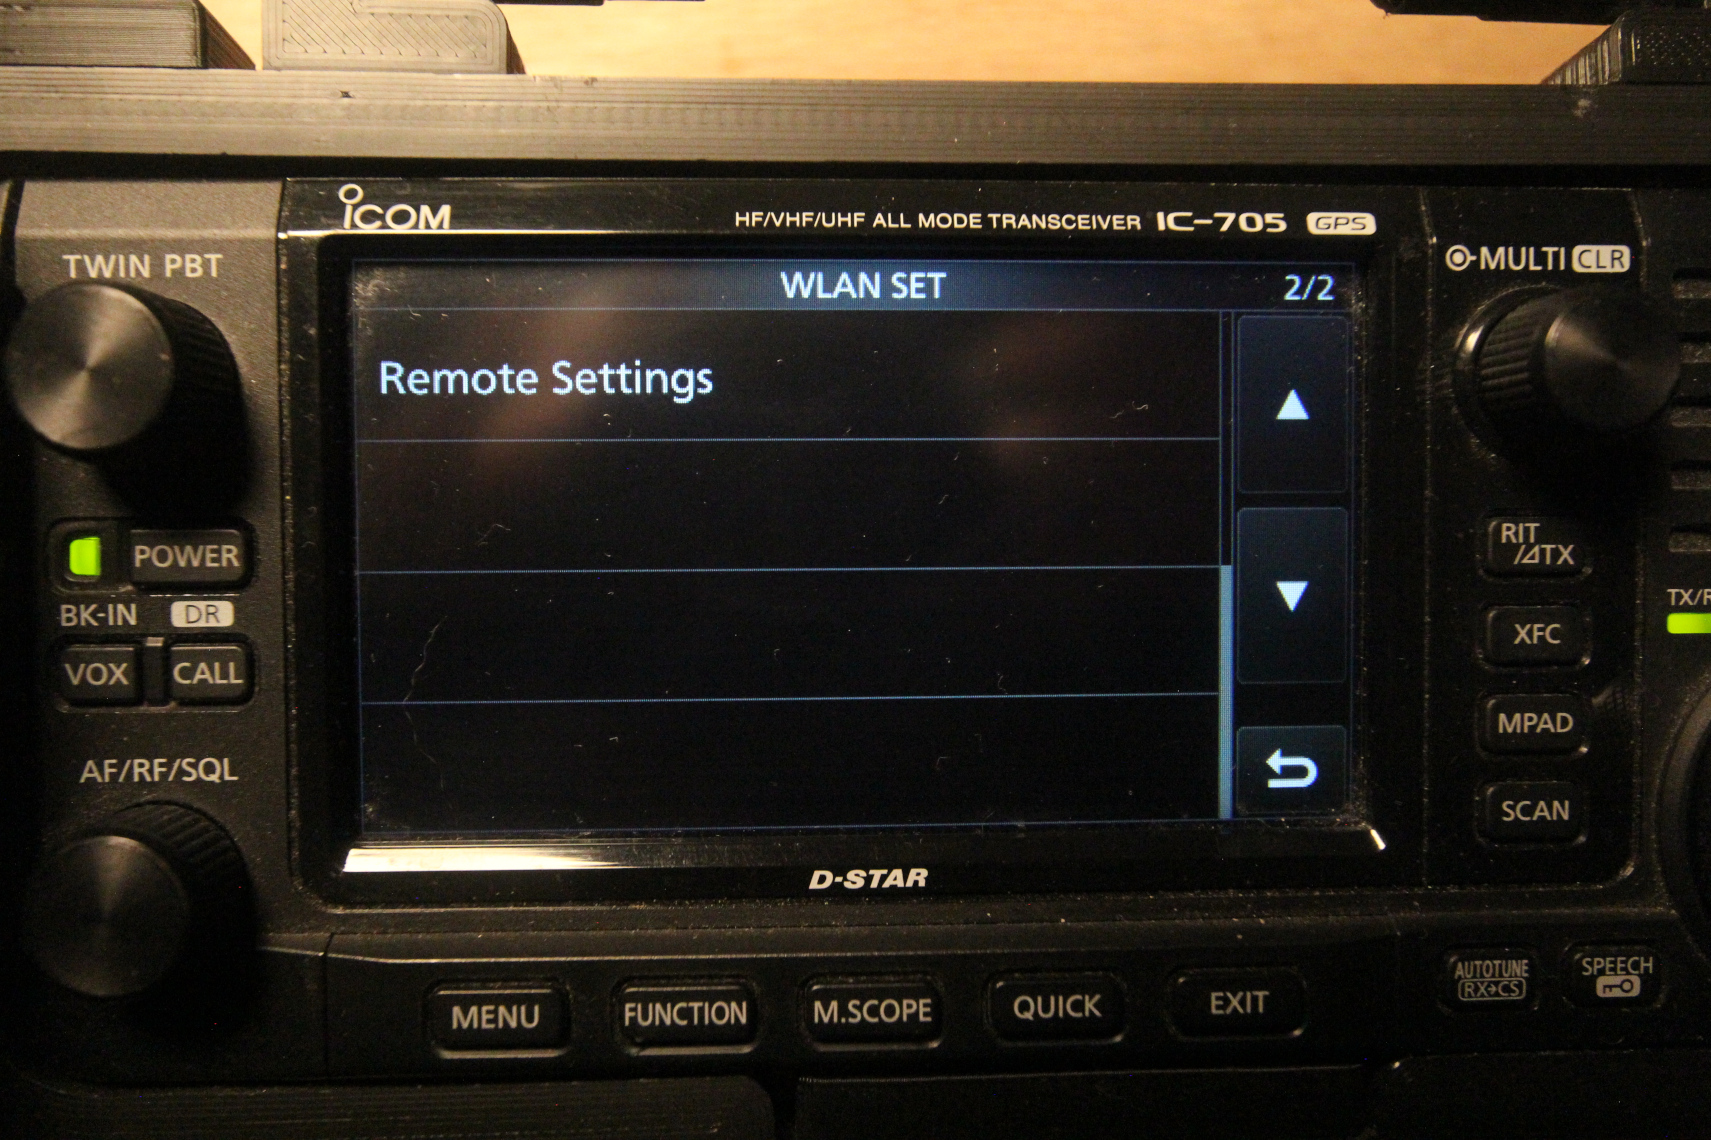
Tap on “Remote Settings” and then tap on “Network User1”:
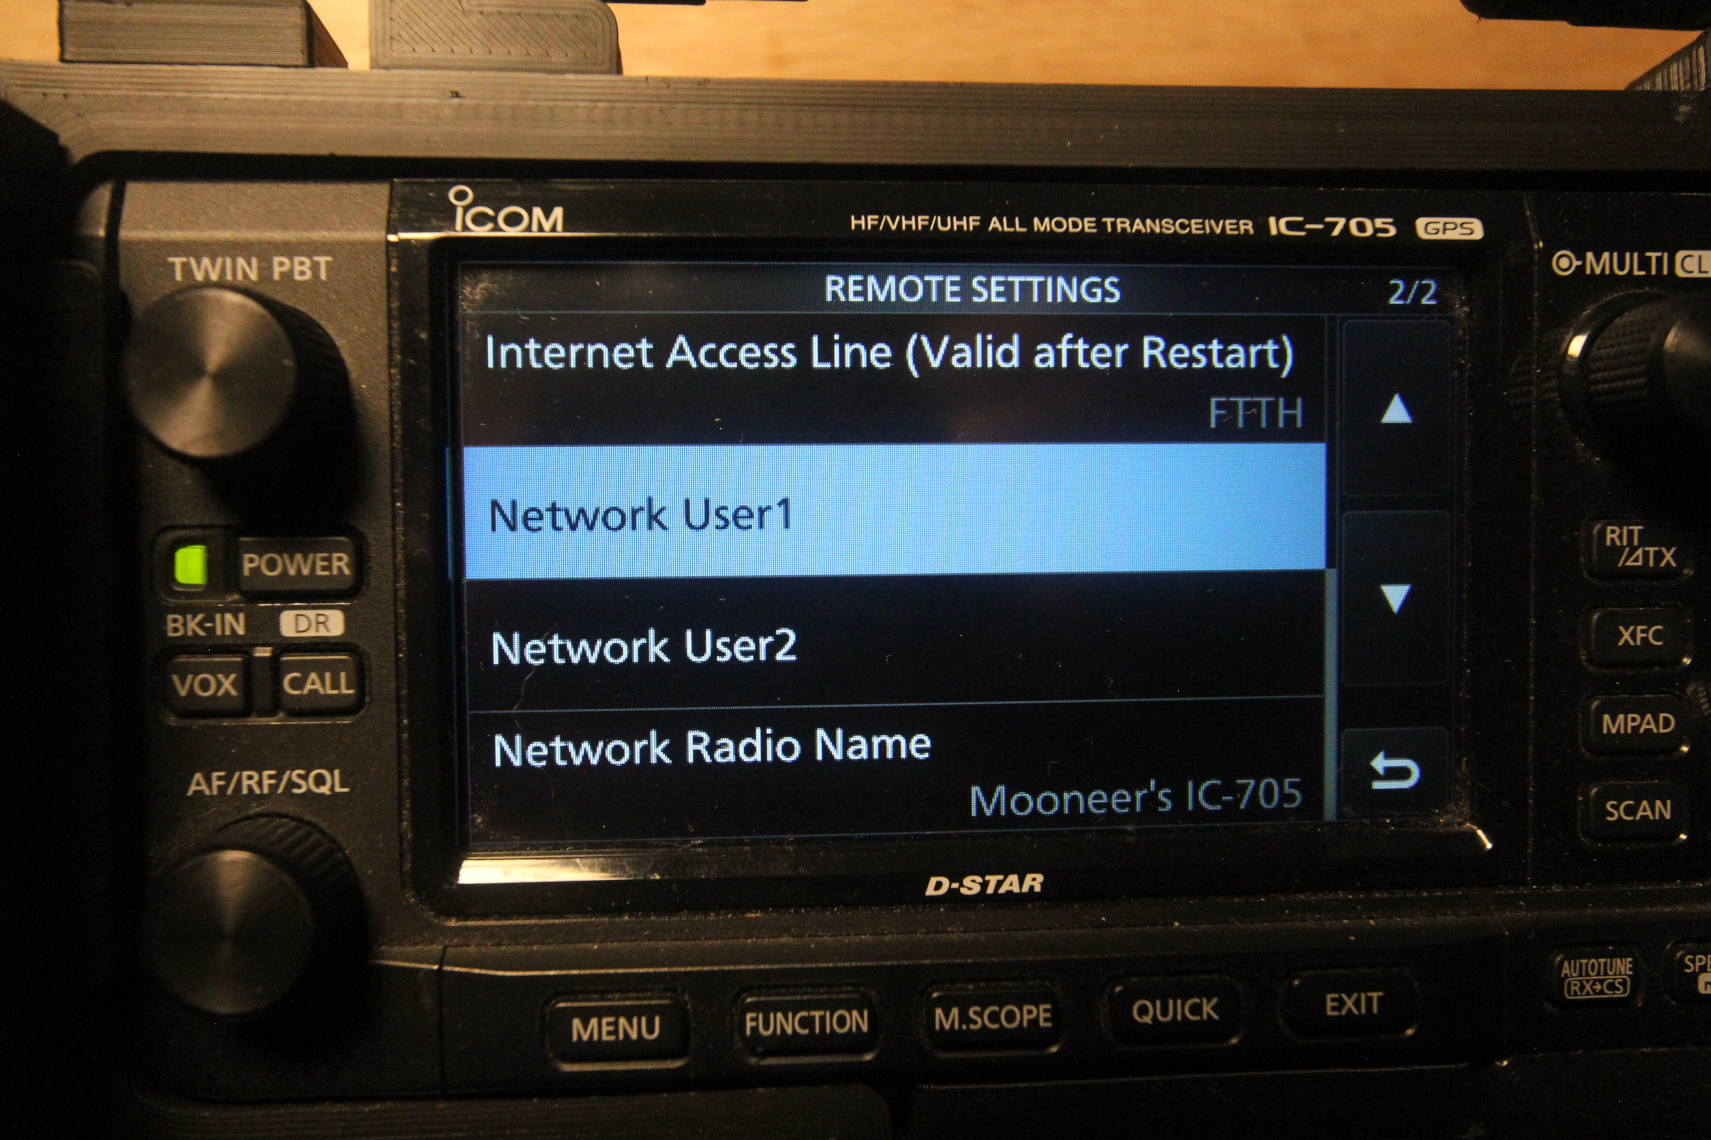
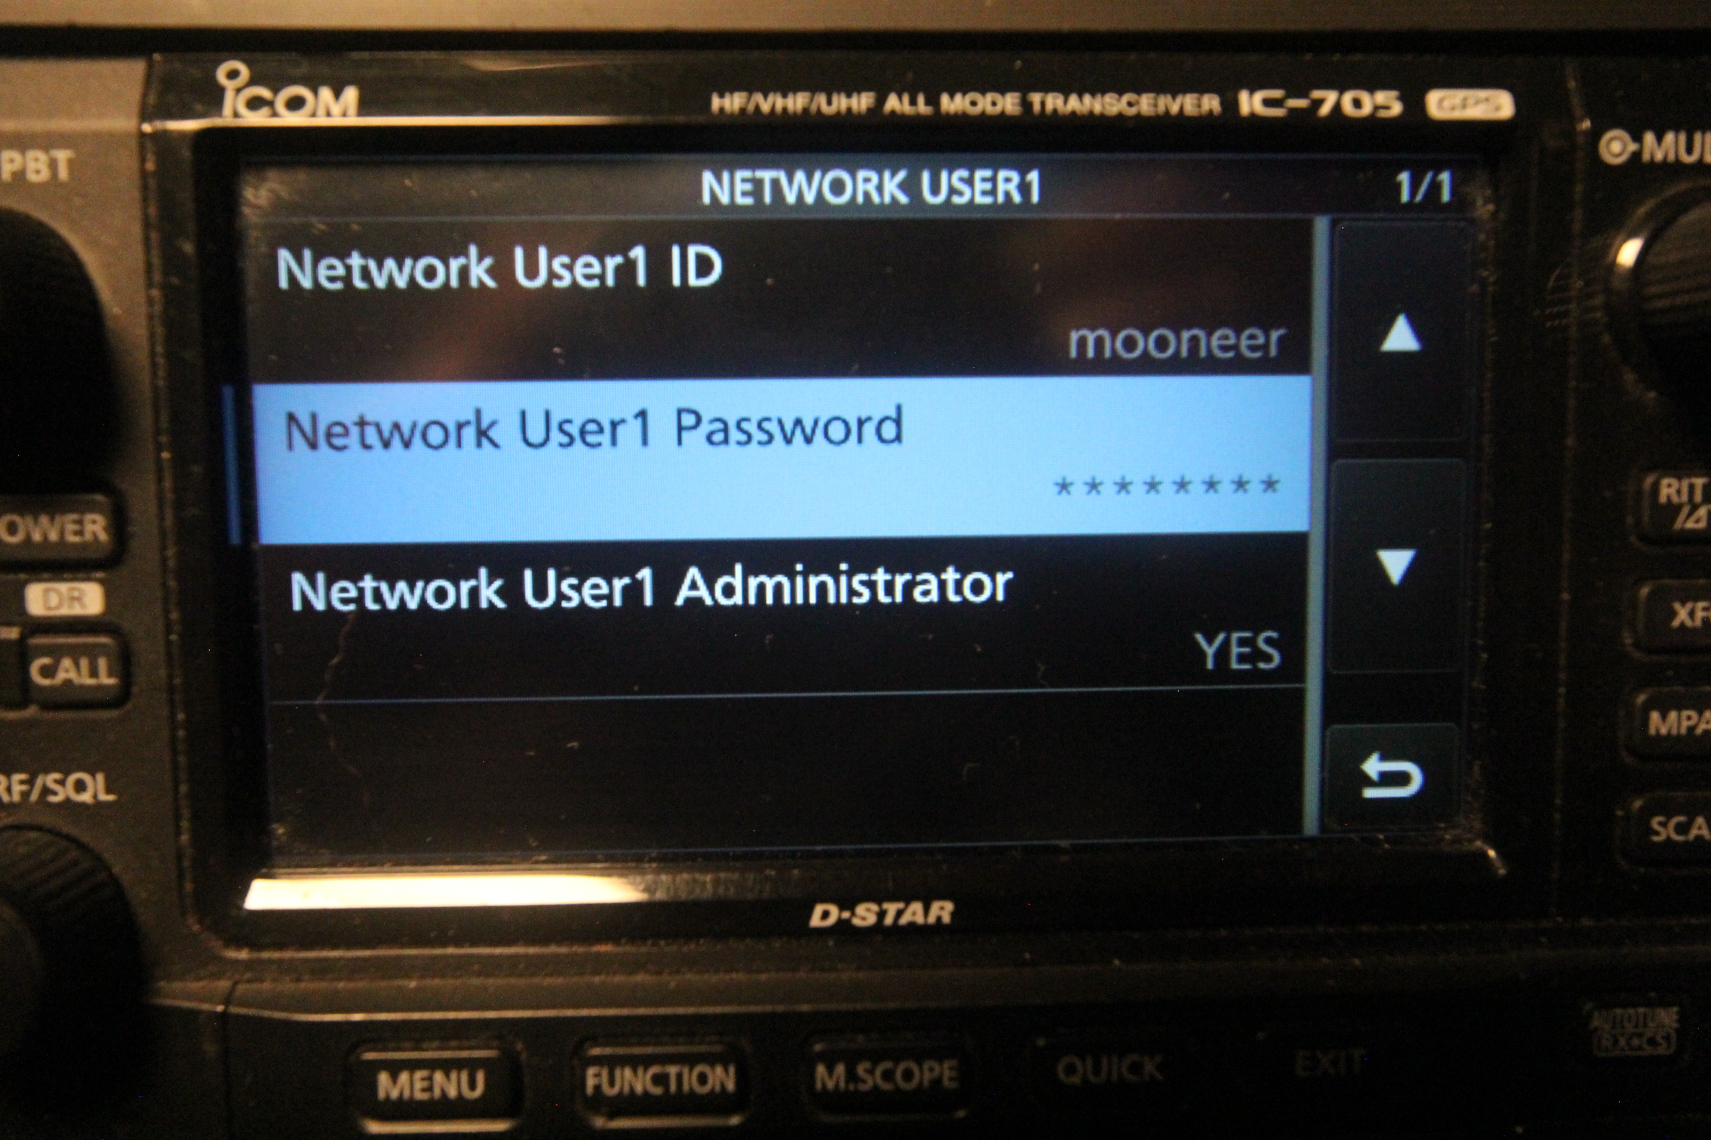
The following page should appear. Tap on “Network User1 ID” and “Network User1 Password” and enter a username and password (if not already saved). Make a note of these as you’ll need them later. Additionally, make sure “Network User1 Administrator” is set to “YES”.
Tap the Back button until you reach the Set menu.
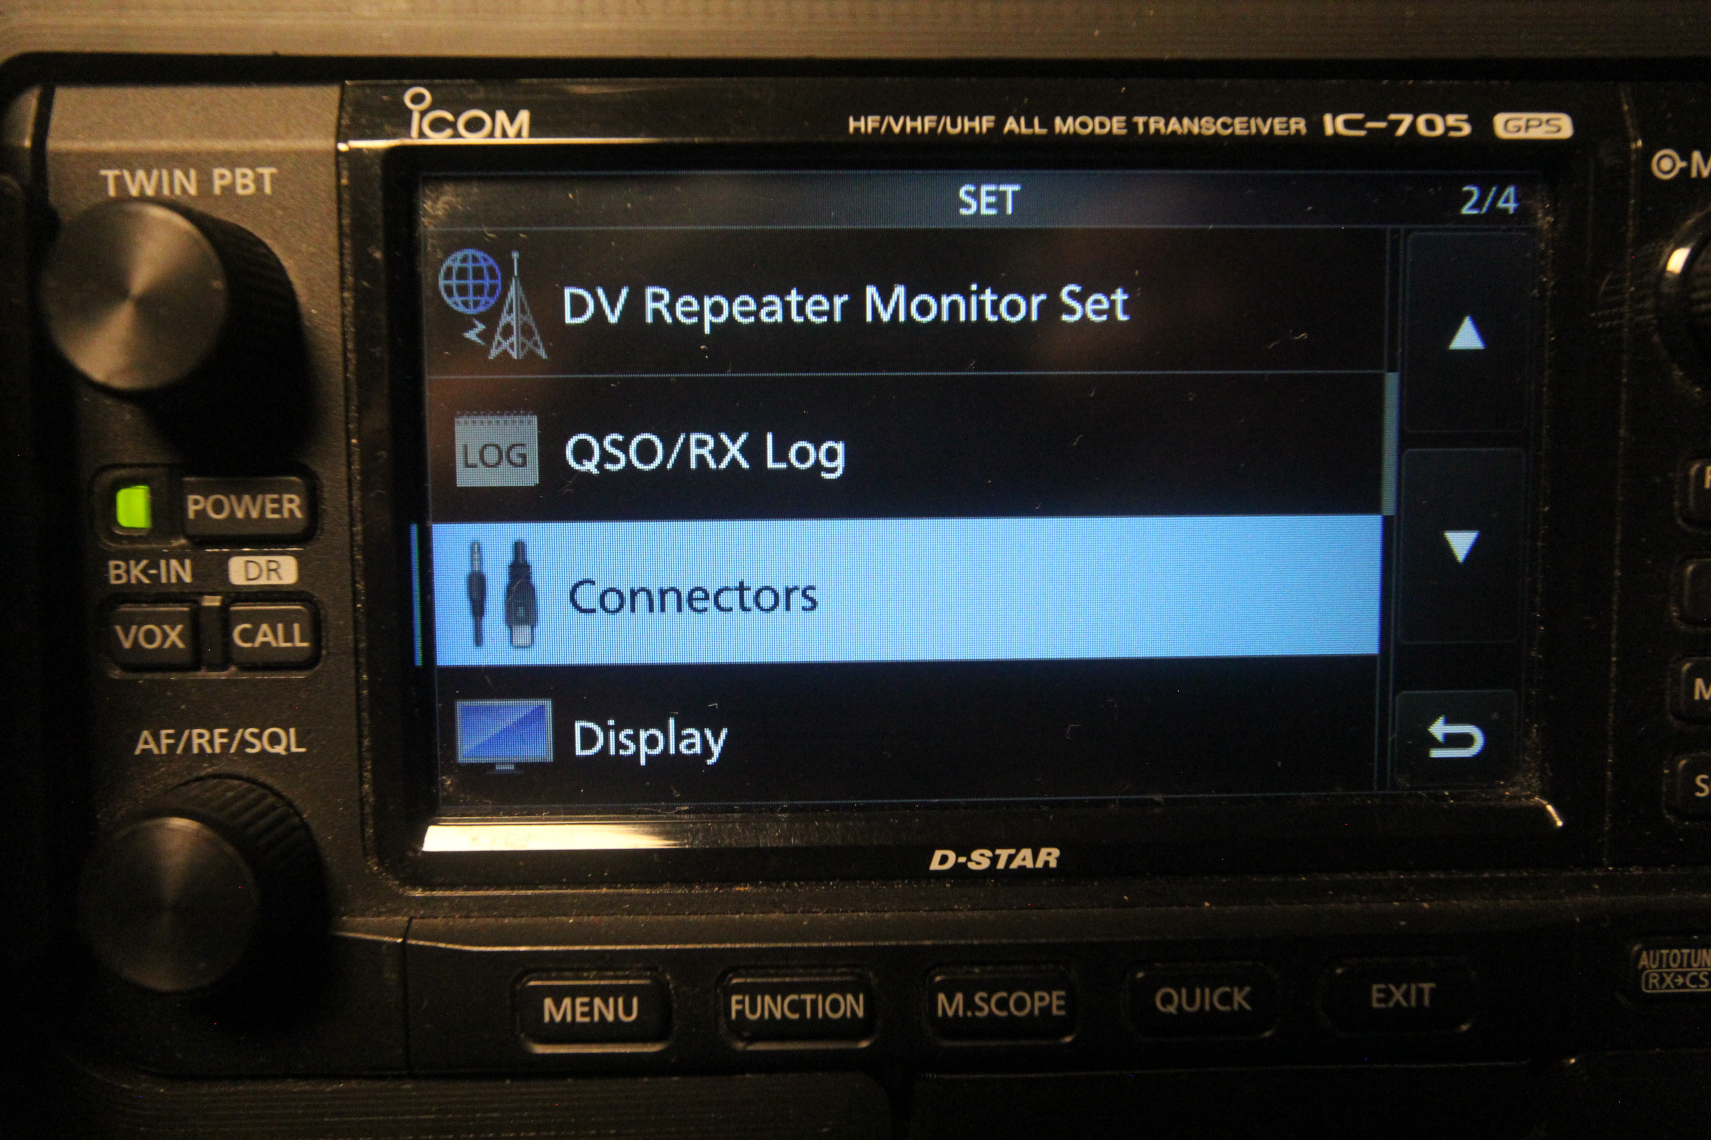
6.4 Configuring Audio
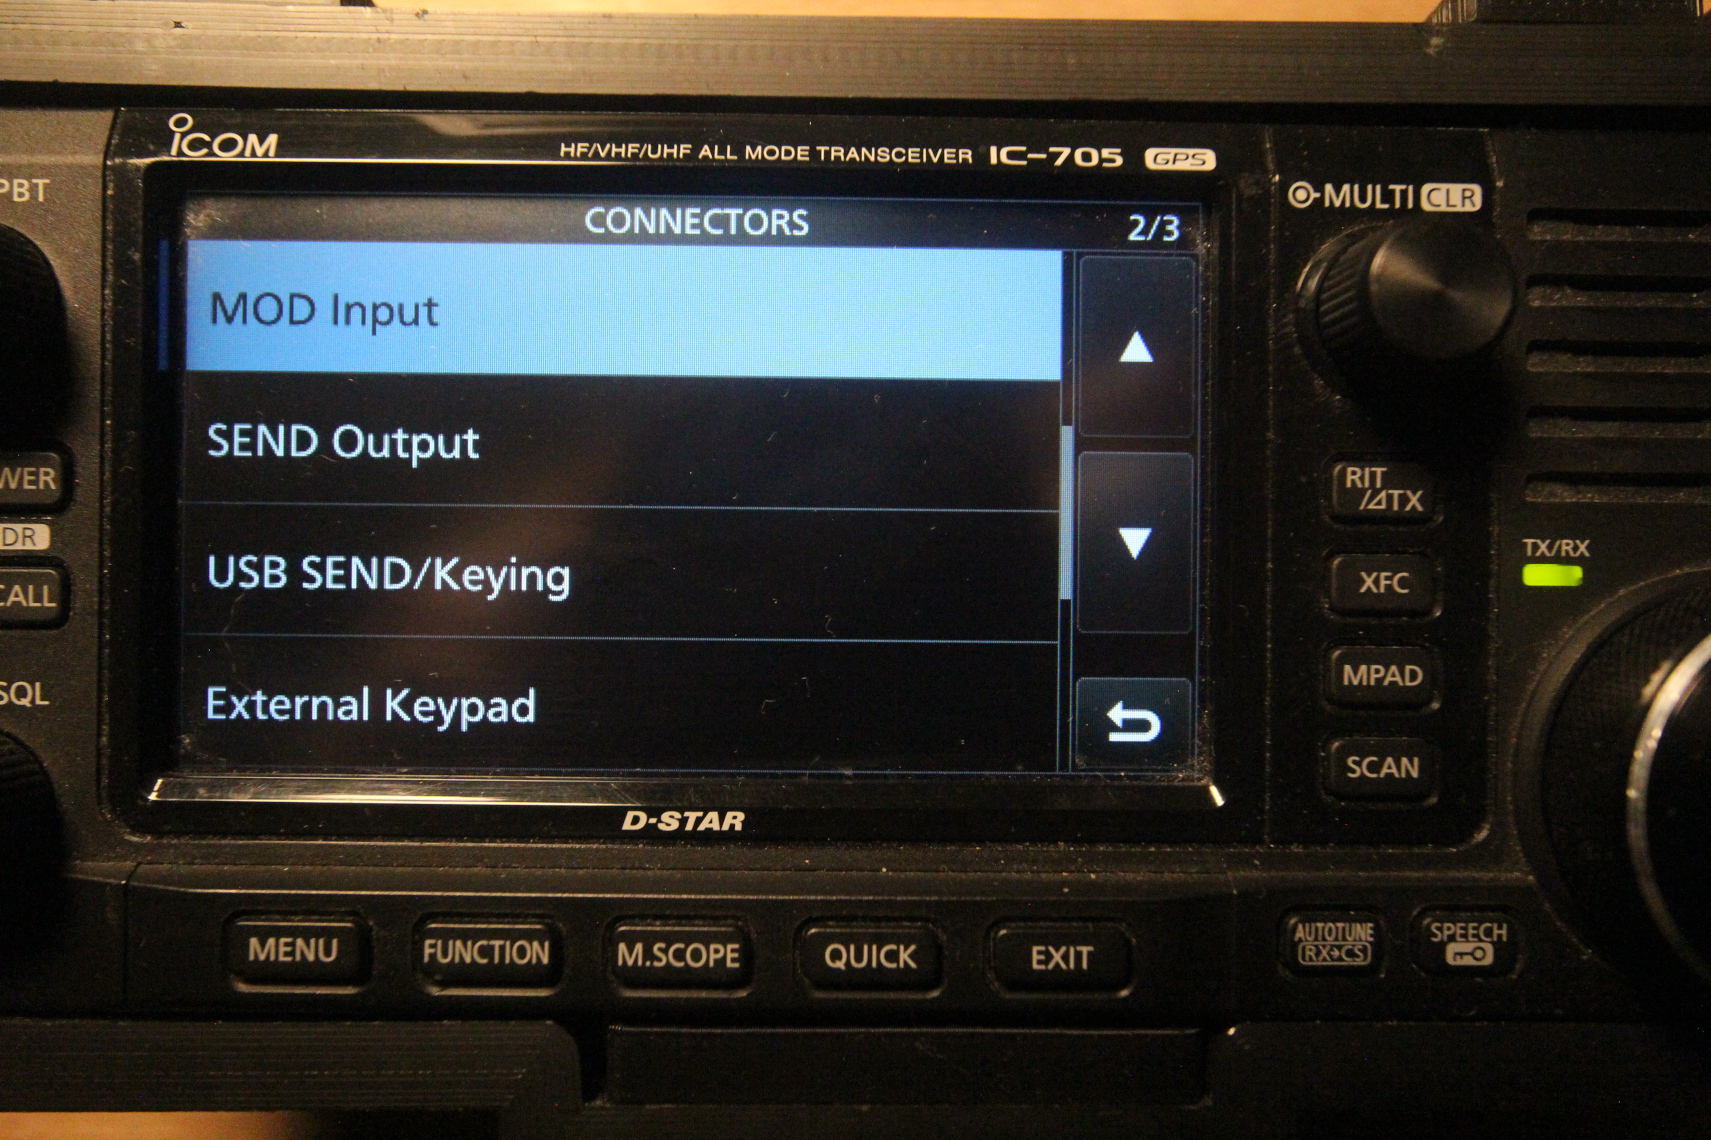
The IC-705 must be configured to accept transmit audio from the Wi-Fi interface in order for transmit with ezDV to work properly. From the Set menu, select “Connectors” as shown below:
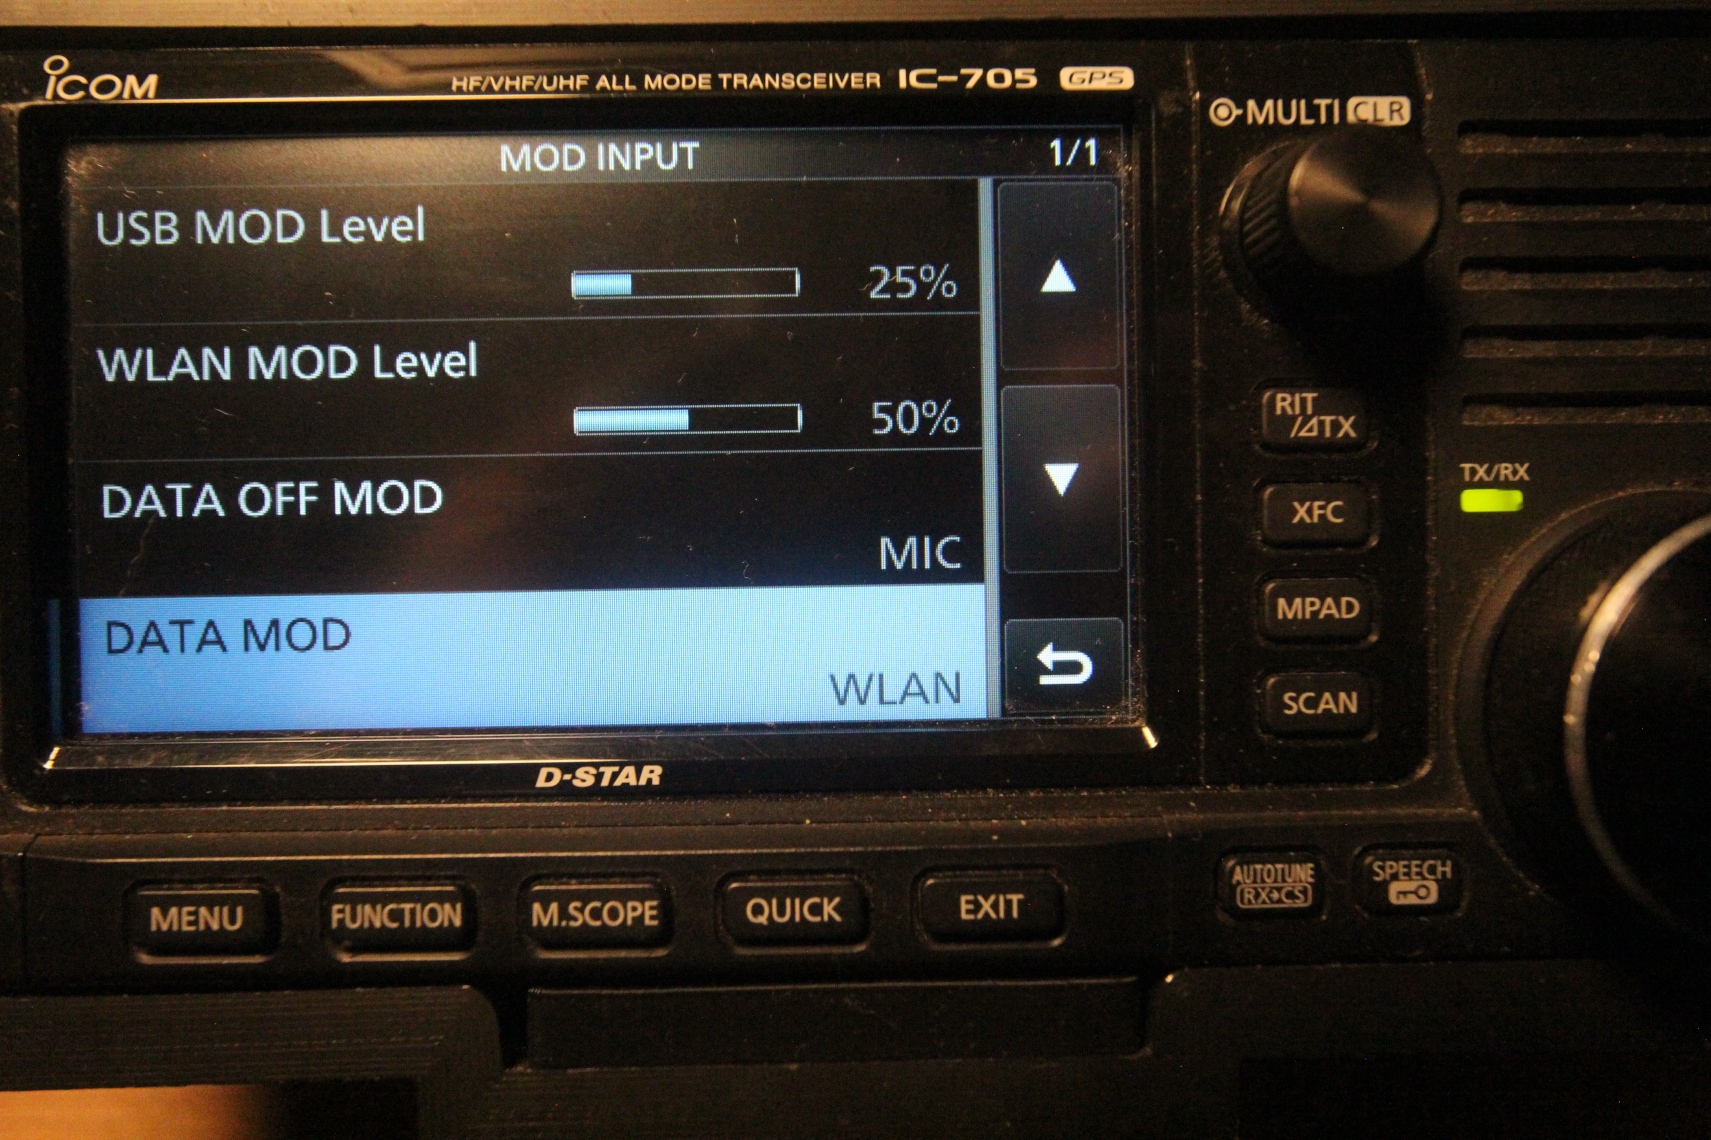
Next, scroll until you find the “MOD Input” option and then tap it to continue:
Finally, tap the “DATA MOD” option and ensure that it is set to “WLAN”:
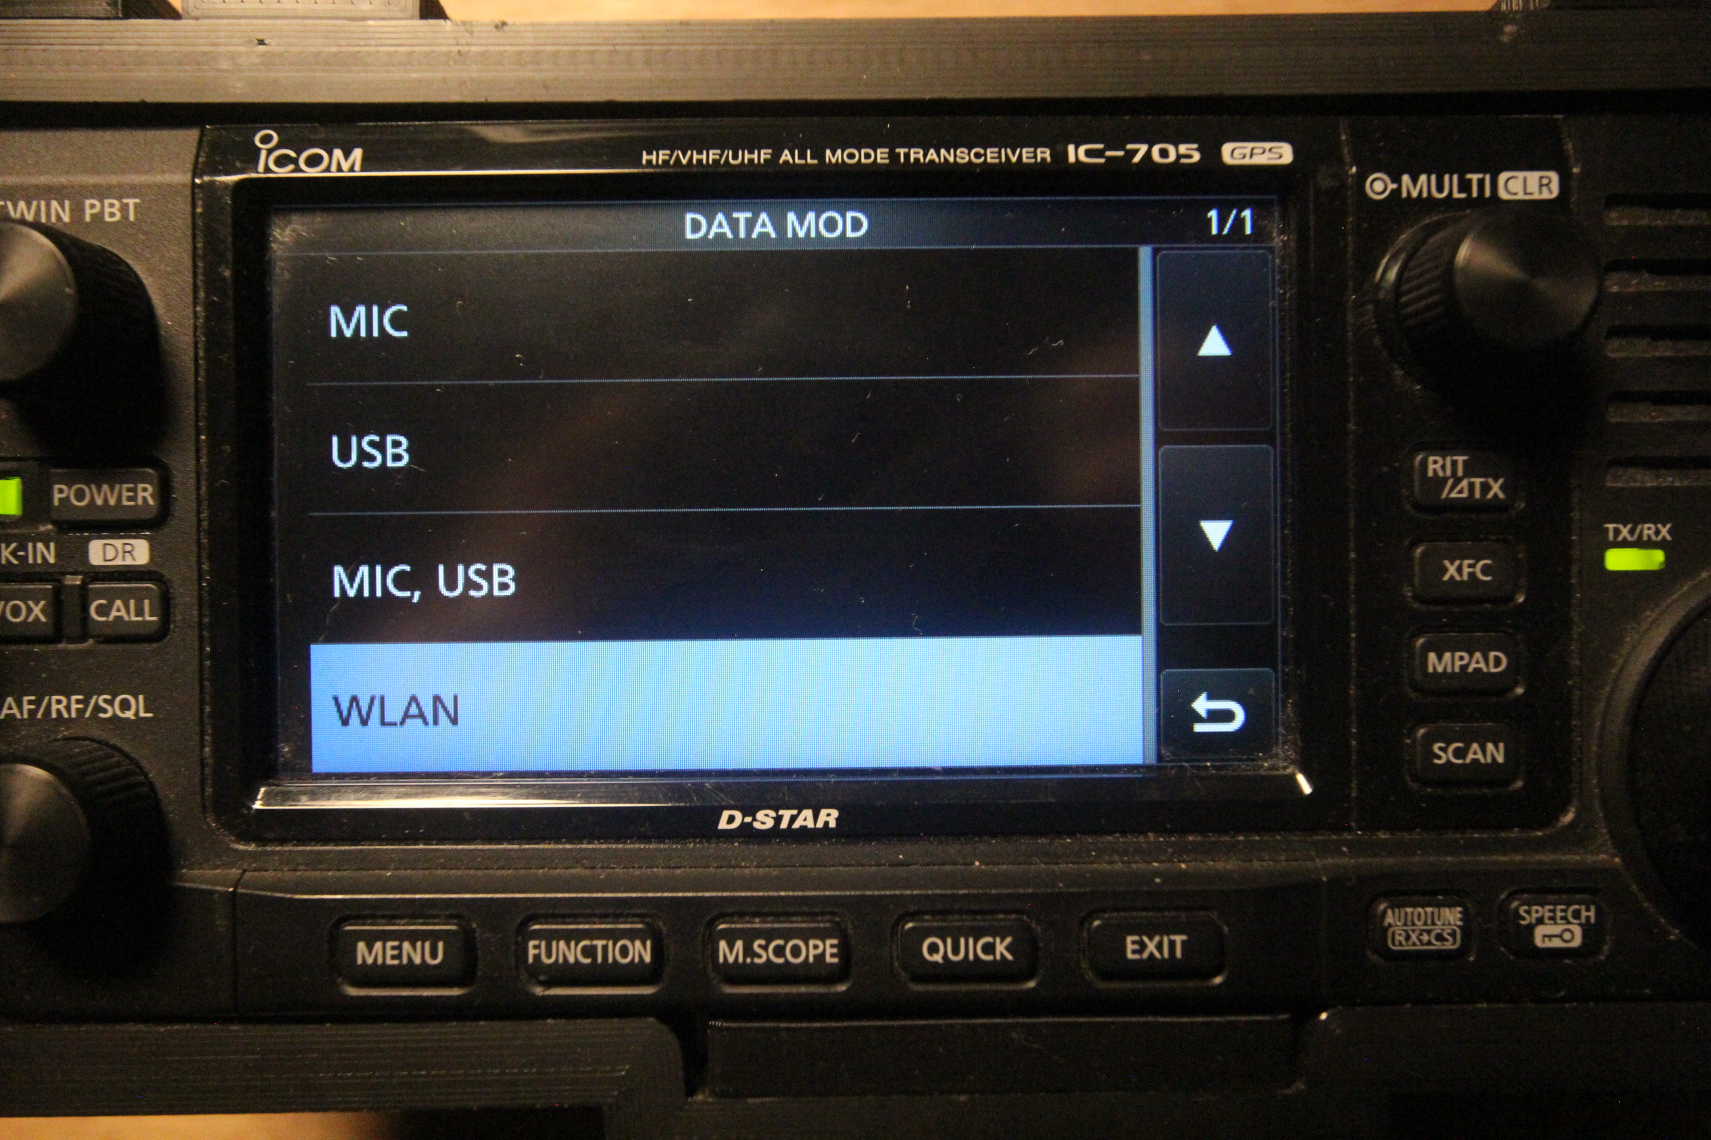
Note: if you share the IC-705 with other data mode applications over USB (for example, WSJT-X for FT8), make sure that “DATA MOD” is set to one of the “USB” options above when done using ezDV.
7 Appendix: Example wiring configurations
Some example configurations are below.
7.1 Elecraft KX3
If you have an Elecraft KX3, you can use off the shelf parts for your interface cable (no soldering required). These parts consist of a 3.5mm splitter and a 3.5mm TRRS cable. The microphone connector on the splitter should be plugged into PHONES on the KX3 while the speaker connector should be plugged into MIC.
This setup will look like the following when plugged in:

8 Appendix: Setting Up Ethernet Support
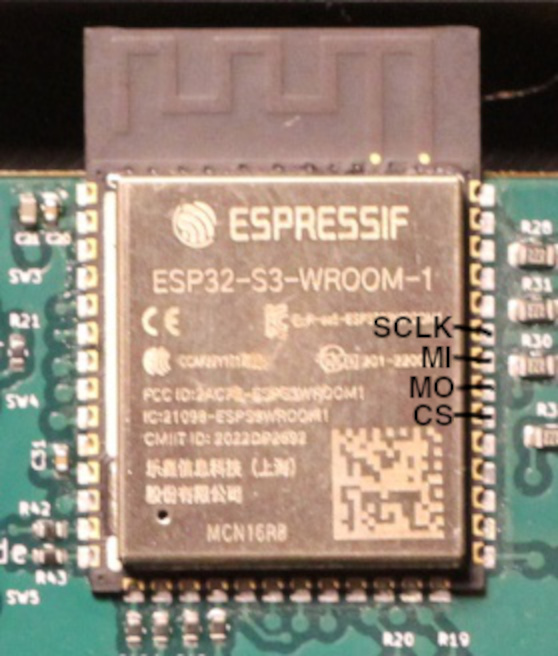
Experimental support exists for Ethernet on ezDV. In order to enable Ethernet support, some hardware modifications are required to be able to attach it to a W5500 Ethernet module:
- Remove the main ezDV board from its enclosure and disconnect the battery from the bottom.
- Solder wires from the positions indicated below on the ESP32 module (near top of board) to their corresponding locations on the W5500 module:
Solder power and ground wires from ezDV to the W5500. These can be taken from J7 (square pin is 3.3V, bottom pin is GND). Note that J7 is always powered.
Reattach the battery and place ezDV back in its enclosure. You may need to cut out a hole in the enclosure using side cutters or similar to allow the previously-soldered wires to be routed out of the enclosure.
Attach an Ethernet cable to the W5500 module and to your router or switch.
Turn on ezDV. If Wi-Fi is already configured, it is recommended to disbale it to prevent network connections from inadvertently going over the wrong interface. Once this is done, restart ezDV.
After a few minutes, look for it on the router’s list of attached devices after a few minutes. Note its IP for future use. It should now be communicating over Ethernet instead of Wi-Fi.